Amazon SageMaker is a fully managed machine learning (ML) service. With SageMaker, data scientists and developers can quickly and easily build and train ML models, and then directly deploy them into a production-ready hosted environment. Sagemaker provides an integrated Jupyter authoring notebook instance for easy access to your data sources for exploration and analysis, so you don’t have to manage servers. It also provides common ML algorithms that are optimized to run efficiently against extremely large data in a distributed environment.
SageMaker requires that the training data for an ML model be present either in Amazon Simple Storage Service (Amazon S3), Amazon Elastic File System (Amazon EFS) or Amazon FSx for Lustre (for more information, refer to Access Training Data). In order to train a model using data stored outside of the three supported storage services, the data first needs to be ingested into one of these services (typically Amazon S3). This requires building a data pipeline (using tools such as Amazon SageMaker Data Wrangler) to move data into Amazon S3. However, this approach may create a data management challenge in terms of managing the lifecycle of this data storage medium, crafting access controls, data auditing, and so on, all for the purpose of staging training data for the duration of the training job. In such situations, it may be desirable to have the data accessible to SageMaker in the ephemeral storage media attached to the ephemeral training instances without the intermediate storage of data in Amazon S3.
This post shows a way to do this using Snowflake as the data source and by downloading the data directly from Snowflake into a SageMaker Training job instance.
Solution overview
We use the California Housing Dataset as a training dataset for this post and train an ML model to predict the median house value for each district. We add this data to Snowflake as a new table. We create a custom training container that downloads data directly from the Snowflake table into the training instance rather than first downloading the data into an S3 bucket. After the data is downloaded into the training instance, the custom training script performs data preparation tasks and then trains the ML model using the XGBoost Estimator. All code for this post is available in the GitHub repo.
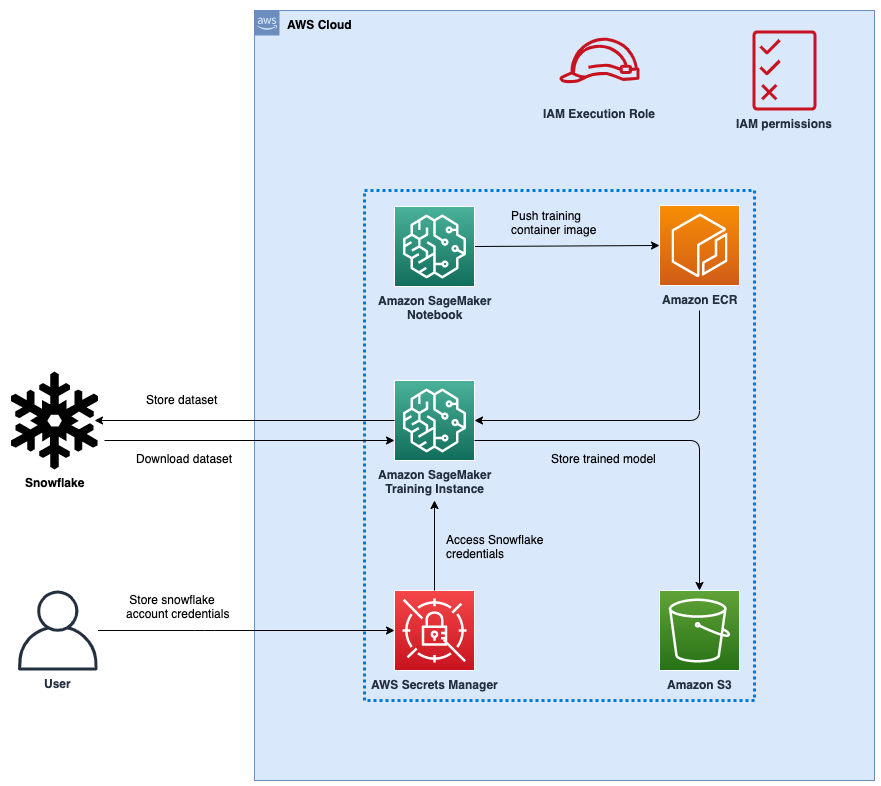
Figure 1: Architecture
The following figure represents the high-level architecture of the proposed solution to use Snowflake as a data source to train ML models with SageMaker.
The workflow steps are as follows:
Set up a SageMaker notebook and an AWS Identity and Access Management (IAM) role with appropriate permissions to allow SageMaker to access Amazon Elastic Container Registry (Amazon ECR), Secrets Manager, and other services within your AWS account.
Store your Snowflake account credentials in AWS Secrets Manager.
Ingest the data in a table in your Snowflake account.
Create a custom container image for ML model training and push it to Amazon ECR.
Launch a SageMaker Training job for training the ML model. The training instance retrieves Snowflake credentials from Secrets Manager and then uses these credentials to download the dataset from Snowflake directly. This is the step that eliminates the need for data to be first downloaded into an S3 bucket.
The trained ML model is stored in an S3 bucket.
Prerequisites
To implement the solution provided in this post, you should have an AWS account, a Snowflake account and familiarity with SageMaker.
Set up a SageMaker Notebook and IAM role
We use AWS CloudFormation to create a SageMaker notebook called aws-aiml-blogpost-sagemaker-snowflake-example and an IAM role called SageMakerSnowFlakeExample. Choose Launch Stack for the Region you want to deploy resources to.
AWS Region
Link
us-east-1 (N. Virginia)
us-east-2 (Ohio)
us-west-1 (N. California)
us-west-2 (Oregon)
eu-west-1 (Dublin)
ap-northeast-1 (Tokyo)
Store Snowflake credentials in Secrets Manager
Store your Snowflake credentials as a secret in Secrets Manager. For instructions on how to create a secret, refer to Create an AWS Secrets Manager secret.
Name the secret snowflake_credentials. This is required because the code in snowflake-load-dataset.ipynb expects the secret to be called that.
Create the secret as a key-value pair with two keys:
username – Your Snowflake user name.
password – The password associated with your Snowflake user name.
Ingest the data in a table in your Snowflake account
To ingest the data, complete the following steps:
On the SageMaker console, choose Notebooks in the navigation pane.
Select the notebook aws-aiml-blogpost-sagemaker-snowflake-example and choose Open JupyterLab.
Figure 2: Open JupyterLab
Choose snowflake-load-dataset.ipynb to open it in JupyterLab. This notebook will ingest the California Housing Dataset to a Snowflake table.
In the notebook, edit the contents of the following cell to replace the placeholder values with the one matching your snowflake account:
On the Run menu, choose Run All Cells to run the code in this notebook. This will download the dataset locally into the notebook and then ingest it into the Snowflake table.
Figure 3: Notebook Run All Cells
The following code snippet in the notebook ingests the dataset into Snowflake. See the snowflake-load-dataset.ipynb notebook for the full code.
Close the notebook after all cells run without any error. Your data is now available in Snowflake. The following screenshot shows the california_housing table created in Snowflake.
Figure 4: Snowflake Table
Run the sagemaker-snowflake-example.ipynb notebook
This notebook creates a custom training container with a Snowflake connection, extracts data from Snowflake into the training instance’s ephemeral storage without staging it in Amazon S3, and performs Distributed Data Parallel (DDP) XGBoost model training on the data. DDP training is not required for model training on such a small dataset; it is included here for illustration of yet another recently released SageMaker feature.
Figure 5: Open SageMaker Snowflake Example Notebook
Create a custom container for training
We now create a custom container for the ML model training job. Note that root access is required for creating a Docker container. This SageMaker notebook was deployed with root access enabled. If your enterprise organization policies don’t allow root access to cloud resources, you may want to use the following Docker file and shell scripts to build a Docker container elsewhere (for example, your laptop) and then push it to Amazon ECR. We use the container based on the SageMaker XGBoost container image 246618743249.dkr.ecr.us-west-2.amazonaws.com/sagemaker-xgboost:1.5-1 with the following additions:
The Snowflake Connector for Python to download the data from the Snowflake table to the training instance.
A Python script to connect to Secrets Manager to retrieve Snowflake credentials.
Using the Snowflake connector and Python script ensures that users who use this container image for ML model training don’t have to write this code as part of their training script and can use this functionality that is already available to them.
The following is the Dockerfile for the training container:
The container image is built and pushed to Amazon ECR. This image is used for training the ML model.
Train the ML model using a SageMaker Training job
After we successfully create the container image and push it to Amazon ECR, we can start using it for model training.
We create a set of Python scripts to download the data from Snowflake using the Snowflake Connector for Python, prepare the data and then use the XGBoost Regressor to train the ML model. It is the step of downloading the data directly to the training instance that avoids having to use Amazon S3 as the intermediate storage for training data.
We facilitate Distributed Data Parallel training by having the training code download a random subset of the data such that each training instance downloads an equal amount of data from Snowflake. For example, if there are two training nodes, then each node downloads a random sample of 50% of the rows in the Snowflake table.See the following code:
We then provide the training script to the SageMaker SDK Estimator along with the source directory so that all the scripts we create can be provided to the training container when the training job is run using the Estimator.fit method:
For more information, refer to Prepare a Scikit-Learn Training Script.
After the model training is complete, the trained model is available as a model.tar.gz file in the default SageMaker bucket for the Region:
You can now deploy the trained model for getting inference on new data! For instructions, refer to Create your endpoint and deploy your model.
Clean up
To avoid incurring future charges, delete the resources. You can do this by deleting the CloudFormation template used to create the IAM role and SageMaker notebook.
Figure 6: Cleaning Up
You will have to delete the Snowflake resources manually from the Snowflake console.
Conclusion
In this post, we showed how to download data stored in a Snowflake table to a SageMaker Training job instance and train an XGBoost model using a custom training container. This approach allows us to directly integrate Snowflake as a data source with a SageMaker notebook without having the data staged in Amazon S3.
We encourage you to learn more by exploring the Amazon SageMaker Python SDK and building a solution using the sample implementation provided in this post and a dataset relevant to your business. If you have questions or suggestions, leave a comment.
About the authors
Amit Arora is an AI and ML specialist architect at Amazon Web Services, helping enterprise customers use cloud-based machine learning services to rapidly scale their innovations. He is also an adjunct lecturer in the MS data science and analytics program at Georgetown University in Washington D.C.
Divya Muralidharan is a Solutions Architect at Amazon Web Services. She is passionate about helping enterprise customers solve business problems with technology. She has a Masters in Computer Science from Rochester Institute of Technology. Outside of office, she spends time cooking, singing, and growing plants.
Sergey Ermolin is a Principal AIML Solutions Architect at AWS. Previously, he was a software solutions architect for deep learning, analytics, and big data technologies at Intel. A Silicon Valley veteran with a passion for machine learning and artificial intelligence, Sergey has been interested in neural networks since pre-GPU days, when he used them to predict aging behavior of quartz crystals and cesium atomic clocks at Hewlett-Packard. Sergey holds an MSEE and a CS certificate from Stanford and a BS degree in physics and mechanical engineering from California State University, Sacramento. Outside of work, Sergey enjoys wine-making, skiing, biking, sailing, and scuba-diving. Sergey is also a volunteer pilot for Angel Flight.