I’ve always been intrigued by Assembly. Every time I’ve looked at the generated Assembly for my C or Zig code, it’s always been interesting to see:
- How the simple things taken for granted are not so trivial at the machine level.
- How compilers cleverly optimise the source code to take advantage of the structure of Assembly.
I believe that one of the best ways to learn something is to take a dive and try implementing it yourself. Based on this, we’ll go on a journey here to implement memcpy in asm, and see what we can learn about machine code.
By the end of this article, you should have a newfound appreciation of all the wonderful work compilers do for us to take our high-level code into machine code.You should also have a greater understanding of when it is necessary to drop down to Assembly for the sake of utilising the machine’s resources beyond what a compiler can perform.
This article is written for x86_64 assembly running on Linux, linked using the ELF64 format, and conforms to the System-V ABI with the AMD64 calling convention. If any of those words didn’t make sense to you, stop here and go through the intro and lesson 0 of this amazing introduction to Assembly.
I use an Intel processor, so most of the processor-specific information comes from Intel, but there is a significant overlap with AMD since they both use the x64 instruction set.
Defining the Interface
While we are writing the entire thing in Assembly, we still want it to be callable from our C code. To this end, add this to your main.c file:
#include "stdint.h"

extern void* asmcpy(void *restrict dest, void *restrict source, uint64_t count);
The extern keyword allows us to define a prototype for a function which exists somewhere outside the specified C code. It will be dynamically or statically linked into the generated executable file during the linking phase.
Asmcpy takes in a pointer to the destination, a pointer to the source, and a count of the bytes to move between the two locations. Even though we’re not going to be compiling the asmcpy routine (it’s already in Assembly), the restrict keyword is still a good hint to let the users of this function know that our function does not expect the source and destination pointers to overlap.
Taking the destination as the first argument, and the source as the second argument makes things line up very nicely with the rdi and rsi registers, which is going to come in handy later.
Hello World
We’re going to try to get a “Hello World” up and running first, before we get into the guts of this. For now, I want to make sure that our function is receiving the source and destination arguments properly. First, here’s our C file:
#include "stdint.h"
extern void asmcpy(void *restrict dest, const void *restrict source, uint64_t count);

int main() {
    char *source = "sourcen";
    char *dest = "dest";

    asmcpy(dest, source, 8);
}
Here’s our asmcpy.asm file:
global asmcpy

section .text
asmcpy:
    mov rax, 1
    mov rdi, 1
    ;rsi already contains a pointer to the source data
    ;rdx already contains the length of the messages
    syscall
    ret
Okay, let’s break this down:
global asmcpy is a directive to expose the asmcpy block so it can be accessed during the linking process. The asmcpy exposed here is the same one being expected by the extern void asmcpy line in our C program. It is the job of the linker to combine these symbols into a final executable.
Section .text contains executable instructions. In this case, we only have the asmcpy block, but there could be a lot more.
In our asmcpy block, we have the actual instructions being executed for this routine. This is a good time as any to remind you that we’re using the System-V Application Binary Interface, so the arguments passed to our function are stored in rdi, rsi, rdx, rcx, r8, and r9 for the 1st, 2nd, 3rd, 4th, 5th, and 6th arguments, respectively.
In order to write to the console, we’ll store the number which corresponds to the POSIX write in rax, and trigger an interrupt with the sycall instruction. The interrupt handler will read the contents of rax and call the corresponding function from the pre-defined syscalls.
mov rax, 1 communicates that we want to access POSIX write to print to the console, and we’ll use the same calling convention to specify the arguments we want to pass to write.
mov rdi, 1 passes 1 as the first argument to POSIXwrite. As a reminder, here’s the function prototype for POSIX write:
ssize_t write(int fd, const void *buf, size_t count);
1 in this case corresponds to stdout, which is the console output.
rsi and rdx — which correspond to the buf and count arguments for write, respectfully — have already been set to point to the source buffer and the count of the bytes to move, so we’re good.
With all of this in place, the syscall instruction triggers the interrupt I mentioned earlier, and the source buffer should be printed to the screen. ret returns to the calling function (int main, in this case).
Assembling, Compiling, and Linking
First, compile main.c to object code:
gcc -c -g -O3 main.c -o main.o
Then, assemble the asmcpy file:
nasm -f elf64 asmcpy.asm -o asmcpy.o #Install binutils if you don't have nasm
Link the two files:
gcc main.o asmcpy.o -o main
And finally, we can run the code:
./main
#Output: Source
If you followed all the steps, you should have some output on your console screen.
Getting Down To Business
Alright, now that everything’s wired up properly, it’s time to work on our implementation of asmcpy. If you’re going to get reasonably good with Assembly, I’d advise that you get used to reading the documentation for different instructions. FelixCloutier is a good start.
Note: If this is your first time doing this, you’re most likely going to get overwhelmed by the sheer amount of instructions you’ll see on that reference. In that case, I advise you to slow down, take a deep breath, and only read the instructions you’re immediately in need of. Over time, you’ll get better at using the reference. I’ll do a short demonstration below.
Reading Assembly Instruction References
The instruction we’re after is MOVS, which moves data from a string to another string. Let’s analyse the reference page in sections:
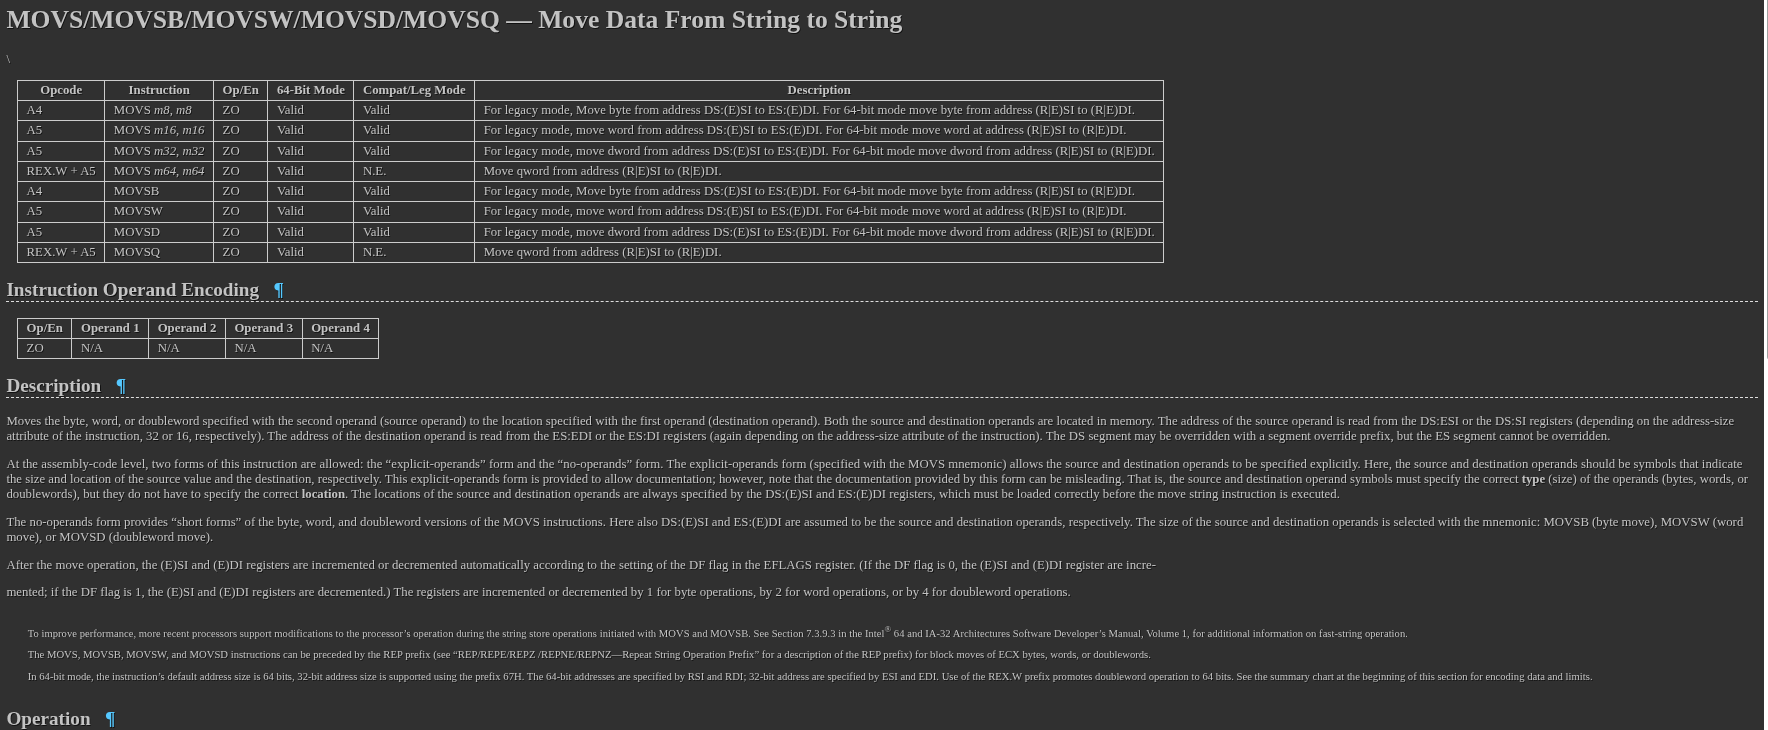
The first section mentions the name of the instruction, as well as the different variants of it. It’s quite common for an instruction to have different variants for operating on bytes(MOVSB), words(2 bytes, MOVSW), double words(MOVSD), or others (not applicable here).

Next, we have the Instruction Summary Table, which organises information about the instruction, its variants, the opcodes, the short description, and other bits of knowledge:
The Opcode Column: Stores the opcode — the byte(s) which will be in the instruction stream fed to the processor. You’ll notice that there are different opcodes for each of the variants. This is how the processor knows which of these to execute.
The Instruction column shows the syntax of the instruction, along with the expected operands for each form. In the first entry, for example, MOVS m8, m8 indicates that this instruction takes an 8-bit/1-byte memory location as the first operand, and an 8-bit/1-byte location as the second parameter. But how did I know that m8 meant 8-bit memory? I’ll let you know in a bit.
The Op/En column contains a key into the Instruction Operand Encoding Table right below this Instruction Summary Table, which provides the information on each of the operands for this instruction, if any.
64-Bit Mode tells us if this opcode is supported in 64-bit mode. For the first entry, valid indicates that this opcode is supported. For most instructions that you run, you won’t need to think too much about this.
Compatibility Mode does the same thing, but for the compatibility mode used by processors. Again, most of the legacy/compatibility-related material in the references is not going to be particularly relevant for common scenarios.
Description does exactly what it sounds like. We can infer from this line that this form of the instruction moves a byte from the RSI register to the RDI register.
Instruction Operand Encoding Table

This table gives more information about the operands to an instruction. Each entry in this table takes the Op/En field from the Instruction Summary Table and specifies whether it has one, two, three, or even four operands, as well as whether the operands are registers, memory operands, or immediate values.
Using the first entry from the Instruction Summary Table as an example, the ZO key there tells us that MOVS m8, m8 takes no operands.
But wait, how can an instruction with two operands in its syntax take no operands? I’m going to save you the stress of getting lost on that one and tell you that the MOVS m8, m8 only exists to document what MOVSB does. The same is applicable for MOVS m16,m16 and MOVSD, etc. This is confirmed by the fact that movsb and MOVS m8, m8 share the same opcode from the table.
Description
Description gives a more thorough breakdown of what exactly the instruction does, its operation procedure, etc.
Before we proceed, this where I’ll recommend Intel’s Software Developer Manuals, specifically the combined Volume 2, which contains a complete reference for the instruction set and other related, useful information. This is also how I knew that m8 refers to 8-bit/1-byte memory.
MOVSB is a relatively easy-to-understand instruction, so you can get the gist of it without consulting the manual, but others aren’t so straightforward.
Operation, Flags, and The Other Fields
Operation gives a pseudocode explanation of what this instruction does.
Flags lets us know which flags, if any, are modified by the instruction’s execution.
Most of the other fields explain the various exceptions which can be thrown by this instruction for various reasons. It’s worth taking a glance at, as they can be useful when debugging.
In case you haven’t put it together from the reference yet (no shame there), MOVS moves some amount of bytes from the memory address in RSI/ESI to the address in RDI/EDI. It then advances or decrements these registers by 1, 2, 4, or 8 bytes depending on the state of the direction flag. The REP prefix can allow us to repeat this operation until RCX is zero.
With all of this information, we’re ready for the first implementation of asmcpy. I encourage you to try it out on your own, though, before you proceed.
Implementing Asmcpy
Here we go.
global asmcpy

section .text
asmcpy:
    cld
    mov rcx, rdx
    rep movsb
    sub rdi, rdx
    mov rax, rdi
    ret
- First, we need to clear the
DFto make sure we’re going forward when we loop. This is whatCLDdoes. - Then,
mov rcx, rdxmoves the count of bytes intorcx. In the AMD64 calling convention, the third argument to the function is held inrdx. Our prototype is
extern void asmcpy(void *restrict dest, void *restrict source, uint64_t count);
This means that count is stored in rdx. However, rep repeats the operation (movsb, in this case) and decrements rcx until rcx is zero. This means that we need to move rdx into rcx.
- Then
rep movsbrepeats the byte-by-byte move untilrcxhits zero. At that point,repterminates.Movsbcopies bytes fromrsitordi. From our calling convention, the source pointer is stored inrsi, and the destination is stored inrdi. Everything lines up perfectly. - We decrement the destination pointer to undo the forward advancements made by
rep(rememberrepadvances both pointers). - Lastly, we store the
rdiinrax, which is the register that gets returned after the function terminates.
Pretty compact, eh?
Let’s run some tests to make sure everything’s correct:
#include "stdint.h"
#include "stdio.h"
#include "stdlib.h"
#include "string.h"
extern void asmcpy(void *restrict dest, void *restrict source, uint64_t count);

void bench(uint64_t size) {
  char *src = malloc(size);
  char *dst = malloc(size);

  for (size_t i = 0; i < size; i++)
    src[i] = (char)(i & 0xFF);

  asmcpy(src, dst, size);
  if (memcmp(dst, src, size) != 0) {
    fprintf(stderr, "FAILED correctness check (size=%zu)n", size);
    exit(1);
  }
}

typedef uint64_t u64;

typedef uint32_t u32;

int main() {

  u64 sizes[] = {
      2,   3,   4,   5,   8,   9,   16,  17,  32,   33,   64,   65,
      128, 129, 256, 257, 512, 513, 768, 769, 1024, 1025};

  const int len = sizeof(sizes) / sizeof(sizes[0]);
  for (int i = 0; i < len; i++) {
    bench(sizes[i]);
  }
}
Everything passes. Sweet!
Note: It might seem like I randomly chose these numbers, but they’ll be pretty important later on.
We’re not done yet, though. What kind of project would this be if we didn’t compare the performance of our implementation to something much more polished? We’re going to compare asmcpy to Libc’s memcpy and see how our implementation stacks up!
Benchmarking Against Libc
Getting a Monotonic Clock
x64(or x86_64, if that’s more familiar to you) processors have a counter called the timestamp counter(TSC) that monotonically increments every CPU cycle, and is reset when the CPU is powered off. This counter can be read with the RDTSC instruction. To learn more about this counter and how it works, you’ll have to take a glance at the combined volume 3s of Intel’s Software Developer Manuals. Specifically, chapter 19. There’s also the reference for RDTSC instruction.
For statistical consistency, we’ll take multiple samples of each, and then compare the min, max, avg, and common operating range of these implementations. First, something minimal.
Creating a Minimal Benchmark
Reading the TSC with C Intrinsics
#include "x86intrin.h"
uint64_t start = __rdtsc();
Intrinsics allow us to write C code that almost exactly maps to Assembly instructions. Here, it’s the RDTSC instruction, which returns current value of the TSC.
Setting up the Rest
void bench_memcpy(u64 size, int runs, u64 results[]) {
  char *src = NULL;
  char *dst = NULL;
  if (init_buffers(&src, &dst, size) != 0) {
    fprintf(stderr, "ERROR while creating buffersn");
    exit(2);
  }
  for (int i = 0; i < runs; i++) {
    u64 start = __rdtsc();
    memcpy(dst, src, size);
    u64 end = __rdtsc();

    assert(end > start);
    u64 diff = end - start;

    assert(diff < end);
    if (memcmp(dst, src, size) != 0) {
      fprintf(stderr, "FAILED correctness check (size=%zu)n", size);
      exit(1);
    }
  }
}
I considered using a function pointer to allow using the same bench for both routines, but I wasn’t sure how that would hinder the optimiser.
Running this code as-is would probably give messy results due to modern CPUs employing out-of-order(OOO) execution. To explain OOO simply, let’s take a look at a simple set of assembly instructions:
mov    rbx, [rsi]
add    rcx, rdx
Even though the mov comes first here, the processor is allowed to execute the add before the mov is done.
The primary reason for this performance — modern CPUs have several execution units for handling different operations such as loads, stores, basic arithmetic, etc. During execution, multiple assembly instructions are fetched from the instruction stream, decoded into some combination of micro ops, and dispatched to different execution units in the processor. In this way, multiple instructions can be in execution at the same time!
In this case, the load from memory might cause the execution units for that instruction to stall for several cycles due to memory latency. However, the adder units in the processor are not hindered by this stall, and are free to work on the add instruction. As long as all the results are rearranged to look as if they had executed in sequential order, everything is fine.
Note: This is a simple summary. I recommend this video by Matt Godbolt for a really exciting breakdown.
So, what does this have to do with our code? Well, let’s look at benchmark again:
u64 start = __rdtsc();
memcpy(dst, src, size);
u64 end = __rdtsc();
Do you see it, yet? Let’s look at the generated assembly for some clues (I’ll show how to do this later).
rdtsc
shl    $0x20, %rdx
mov    %rax, %r15
mov    %r13, %rsi
mov    %r12, %rdi
or     %rdx, %r15
mov    %rbp, %rdx
call   0x401070 <memcpy@plt>
rdtsc
Even if rdtsc is executed before and after memcpy, the CPU could reorder the exeuction such that rdtsc actually takes its reading while memcpy is being executed. This means we’d get inaccurate results. Here’s a line from the official reference:
…The RDTSC instruction is not a serializing instruction. It does not necessarily wait until all previous instructions have been executed before reading the counter. Similarly, subsequent instructions may begin execution before the read operation is performed…
So, how do solve this? We’ll use serialising instructions. But what a serialising instruction? I’ll give a brief explainer.
Serialisation And Program Order
Nothing is as it seems. In the pursuit of performance, modern CPUs perform all sorts of trickery under the hood to ensure that the hardware is kept as busy as possible. This includes reordering of memory loads and stores to optimise CPU bandwidth, and directly transmitting data between instructions instead of memory. Say we had two instructions:
mov [rdi], 10
mov rdx, [rsi]
And both of these instructions accessed the same memory location; rather than writing to the cache or main memory and then reading it again for the second instruction, the processor is instead allowed to directly transmit the write from the first instruction the second instruction, optimising memory bandwidth.
Intel CPUs(and some others) also employ buffering of writes to memory: Instead of writing multiple times to memory, the writes might be buffered in one of different internal buffers — including the store buffer, write-combining buffer, or some other intermediate location — and flushed to memory only when necessary. If you’d like to learn more about this, you’ll have to take a look Volume 3 of — you guessed it — Intel’s Software Developer Manuals. Specifically, chapter 13.
All of this, especially when combined with the OOO mechanism from before, means that at any point in time, it can be very difficult to have idea of which instruction has been fully retired, and the current state of memory.
Serialising instructions serve as checkpoints in the program order which guarantee various levels of consistency before proceeding. Take LFENCE, for example — it’s reference page states:
Performs a serializing operation on all load-from-memory instructions that were issued prior the LFENCE instruction. Specifically, LFENCE does not execute until all prior instructions have completed locally, and no later instruction begins execution until LFENCE completes. In particular, an instruction that loads from memory and that precedes an LFENCE receives data from memory prior to completion of the LFENCE..
Visualising it would look something like this:
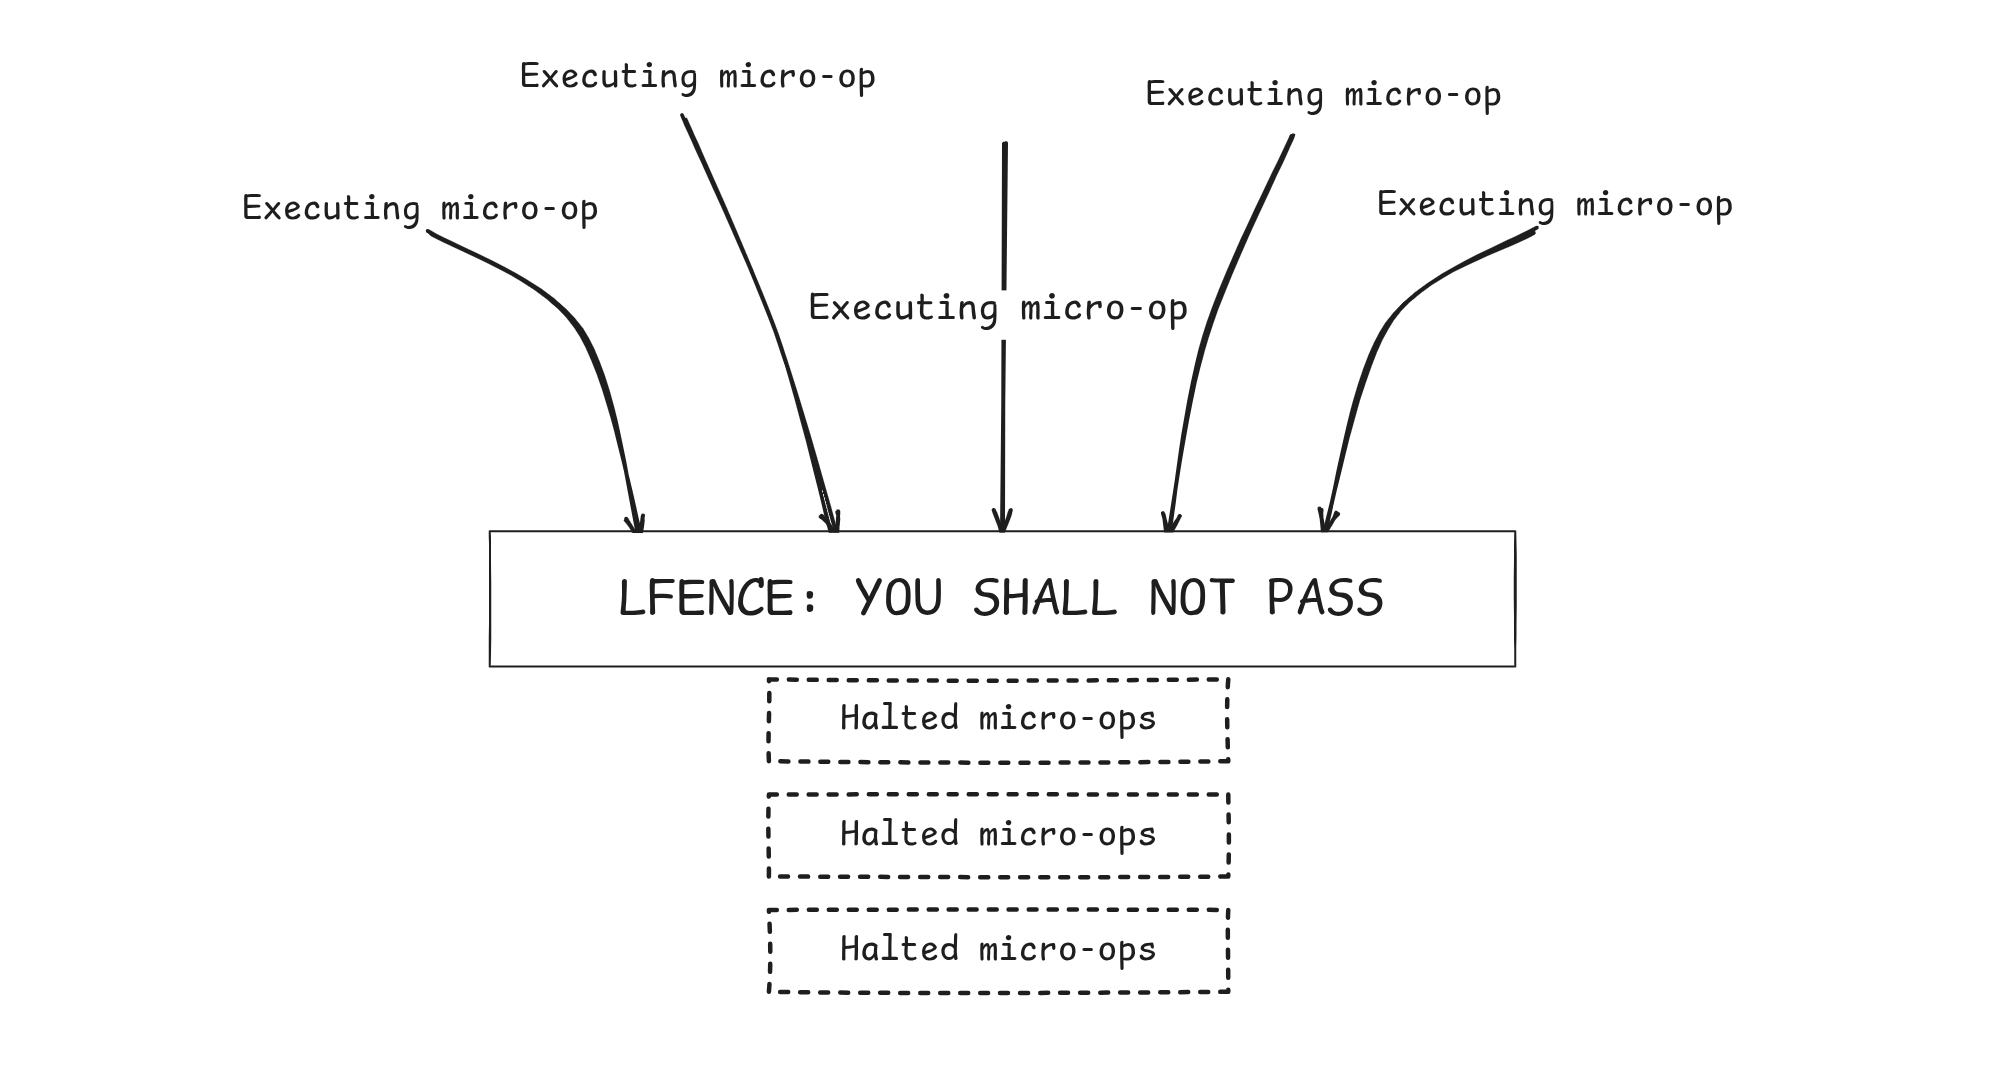
If you read beyond this part, though, you’ll encounter a caveat…
…(An LFENCE that follows an instruction that stores to memory might complete before the data being stored have become globally visible.) Instructions following an LFENCE may be fetched from memory before the LFENCE, but they will not execute (even speculatively) until the LFENCE completes.
Globally visible here refers to whether or not other processors/cores on the same system are able to see the results of an instruction. Again, because writes to memory are buffered, a write performed by a processor might not be visible to other processors in the same system until the writes are flushed to memory — there are other mechanisms around this, but those aren’t immediately relevant.
We’re running single-threaded code here, so the part about stores not being globally visible is fine; we only care that the instructions are done executing and have registered the data to be written to the memory, we don’t really care when they are written to memory.
Serialising with RDTSCP and LFENCE
RDTSCP reads the TSC, but also reads the CPUID from a different register. Like LFENCE, it waits until previous instructions are complete — unlike LFENCE, however, it does not stop instructions which come after it from being executed while it is running.
With all of this in mind, we can rewrite our code to make sure no funny business is going on.
u64 rdtscp() {
  u32 id;
  return __rdtscp(&id);
}

void bench_memcpy(u64 size, int runs, u64 results[]) {
  char *src = NULL;
  char *dst = NULL;
  if (init_buffers(&src, &dst, size) != 0) {
    fprintf(stderr, "ERROR while creating buffersn");
    exit(2);
  }
  assert(src != NULL && dst != NULL);

  for (int i = 0; i < runs; i++) {
    u64 start = rdtscp();
    __asm__ __volatile__("lfence" ::: "memory");

    memcpy(dst, src, size);

    u64 end = rdtscp();
    __asm__ __volatile__("lfence" ::: "memory");

    assert(end > start);
    u64 diff = end - start;

    assert(diff < end);
    if (memcmp(dst, src, size) != 0) {
      fprintf(stderr, "FAILED correctness check (size=%zu)n", size);
      exit(1);
    }

    results[i] = diff;
  }
  free(src);
  free(dst);
}
We’re not done yet, though.
Even if TSC increments with every cycle of the processor, it doesn’t increment faster when the processor clock changes — e.g. laptops might dynamically adjust their frequencies depending on their current load and power state. This behaviour means that when running on a laptop (which I am), we’ll have to ensure that the frequency of the processor is as fixed as possible to avoid unfair results. If you’re on a desktop PC, you don’t really need to do this.
Stabilising the Frequency on Linux
First, disable hyperthreading/SMT. It can lead to some unpredictability in results.
CPU frequency scaling is implemented via the CPUFreq subsystem on Linux. While we could directly interact with this subsytem, I like to use Cpupower as my preferred frontend, though you’re free to use whatever you wish.
I use an Intel Ice Lake processor, but you should be able to follow along for most cases.
First, we need to get information about the frequency range the hardware supports by running:
cpupower -c <Specific core here> frequency-info
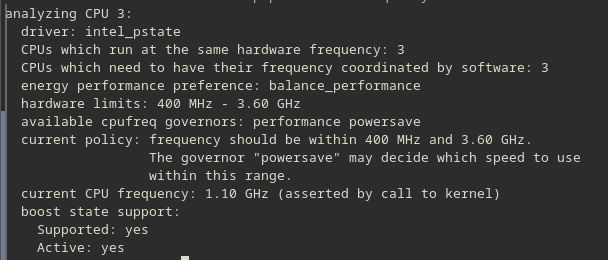
Pay attention to the “hardware limits” section. From this, we can see that this core is capable of operating between 400Mhz and 3.6 GHz. We’ll need this information to specify an operating range.
Note: In my tests, I was not able to reliably pin my CPU to a specific frequency. Rather, it seems like mobile CPUs only take “suggestions”, and do their best to minimise fluctuations around the specified frequencies. If someone has a way around this, please reach out to me.
To “suggest” to the CPU to stay at a reasonable range, we’ll use the frequency-set min and frequency-set max to lock it:
sudo cpupower -c 3 frequency-set -g performance
sudo cpupower -c 3 frequency-set --min 2500000
sudo cpupower -c 3 frequency-set --max 2600000
If you watch the CPU frequencies with watch -n1 'cat /proc/cpuinfo | grep -i "mhz"', you’ll notice that the frequencies occasionally wander outside the range, but this has been stable enough for tests.
Pinning and Minimising Scheduling
We’ve successfully suggested CPU 3 to execute within a specified range. Now, we need to make sure that our program only executes on that CPU. This can be done with tasket:
taskset -c <core> <program>
Then, to make sure that the current program isn’t scheduled out by the kernel, we’ll increase the scheduling priority with the nice utility on Linux (this probably isn’t necessary since we already have taskset, but let’s just be safe):
sudo nice -n -20 <program> #-20 is the highest priority
Benchmarking Our Code
After all of that work, we’re ready to get some results. The link to the full code for this run is available here. Some things, first:
- For this implementation, we’ll try to optimise up to 2048 bytes — half of the page size on many systems. That should be enough to cover a lot of general usecases. Translation: I haven’t figured out how to beat
memcpybeyond that. - You’ll notice that the input data is segmented in the source code. This is because i found that earlier runs would sometimes affect the later results, particularly as the input sizes increased — I suspect this has to do with caching, eviction, or some other memory issue; I’m not sure yet — separating the inputs into different benchmarks resolved this.This might differ on your system, and you should probably experiment to find the right configuration. Who would have thought that microbenchmarking manually would be so tricky? Perhaps I should use a proven library…
- Because of the above-mentioned point, we’ll focus more on the relation between the numbers, as opposed to the numbers themselves.
In addition to the optimisation for size, these tests are designed to check performance for ailgned and unaligned operations. This blog provides a good explanation on this topic. First, we’ll take a look at the generated assembly to make sure that nothing funny’s going on with objdump -d main | less…
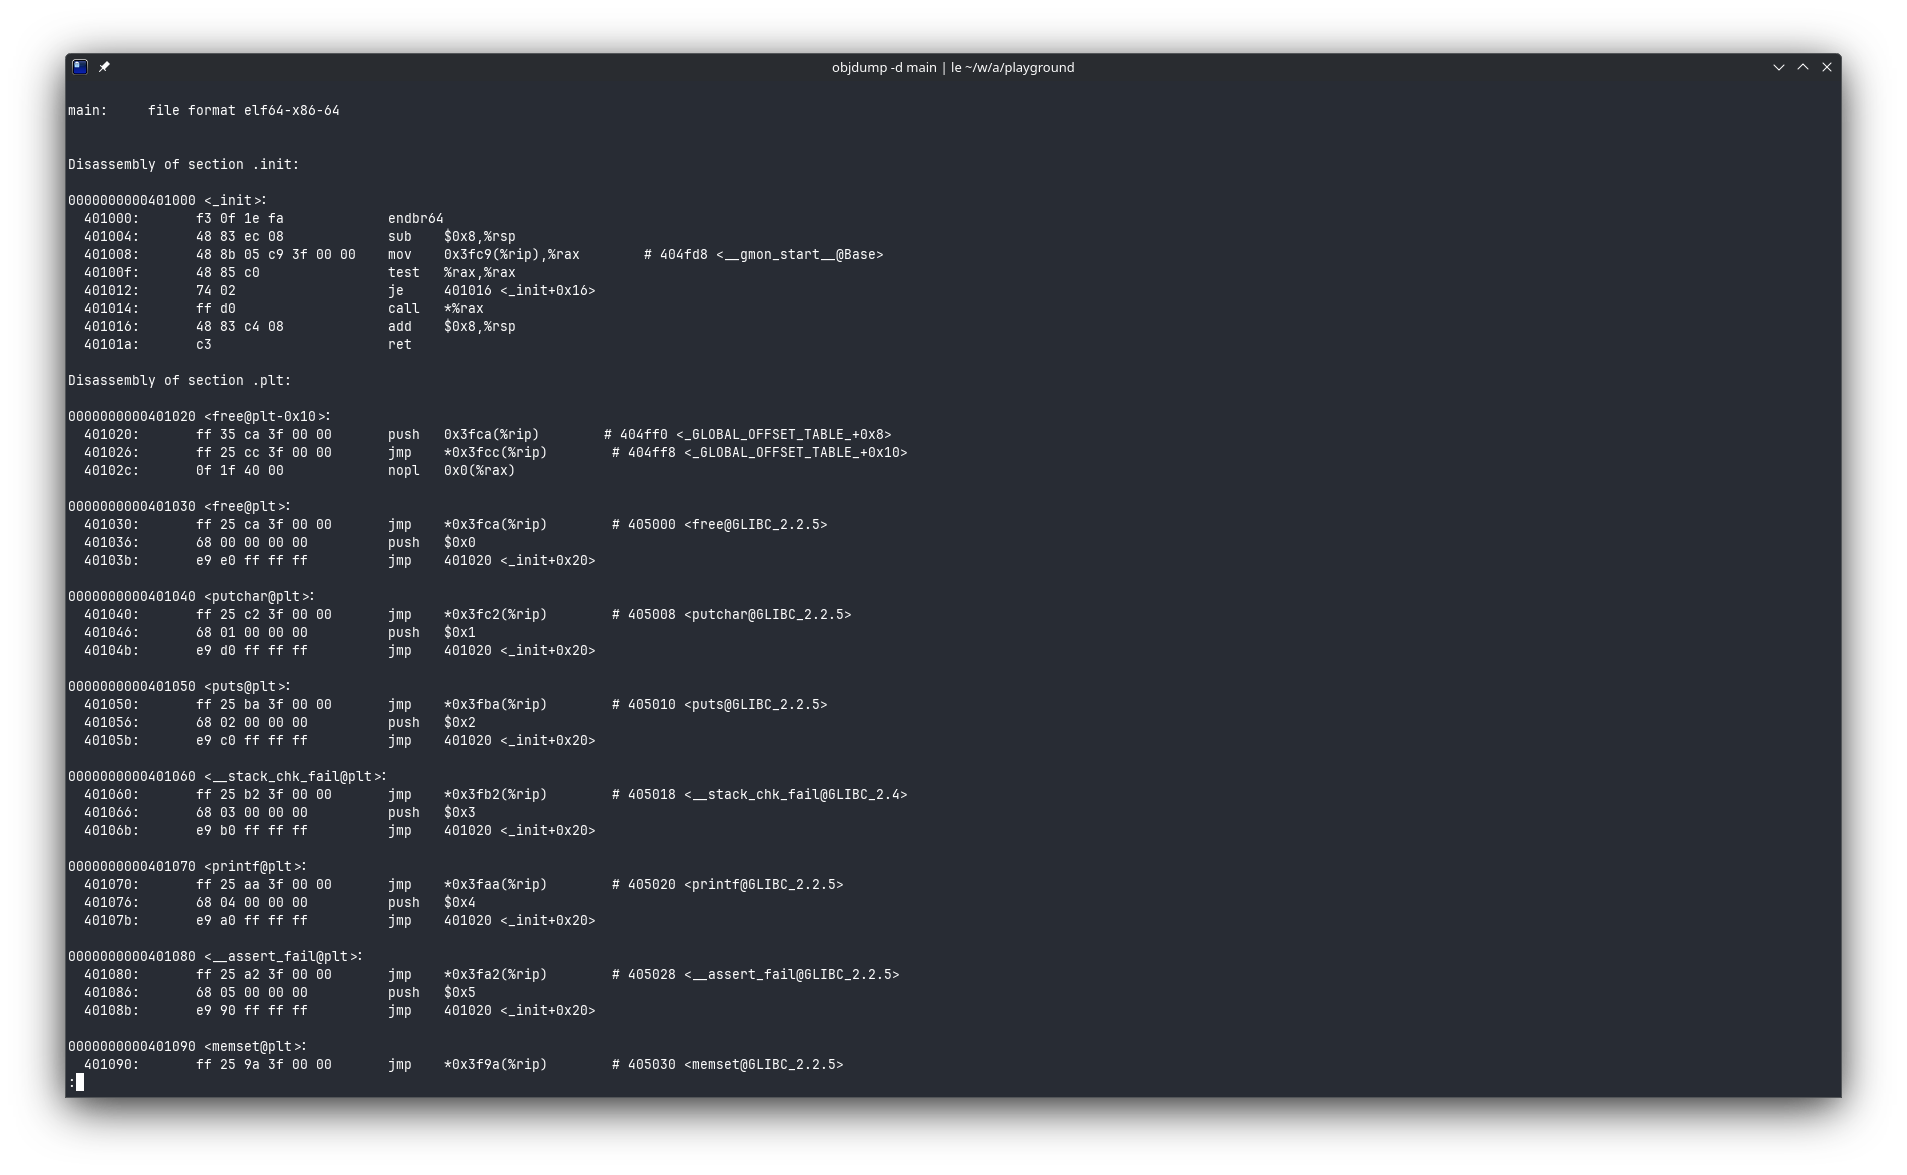
Due to the compiler reshuffling our code all over the place, you might have difficulties finding the benchmarks. You can hit key / on your keyboard to search and enter “rdtscp” as your search term. This’ll take you to the first occurence of that instruction in the text. 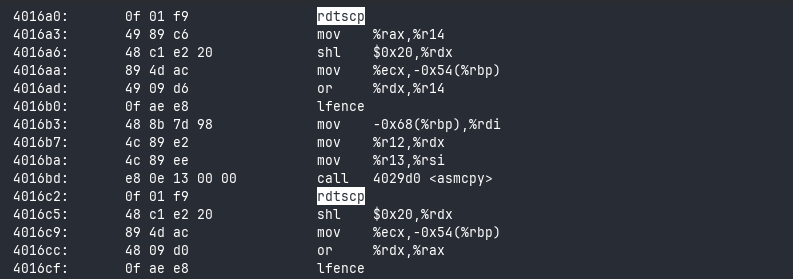
rdtscp, then lfence, asmcpy, rdtscp again, and lfence to finish it off.Bouncing around the searches, we can find the block for memcpy:
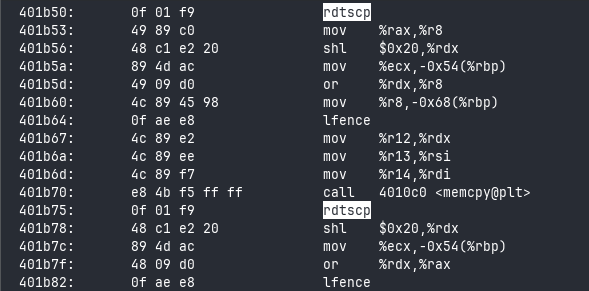
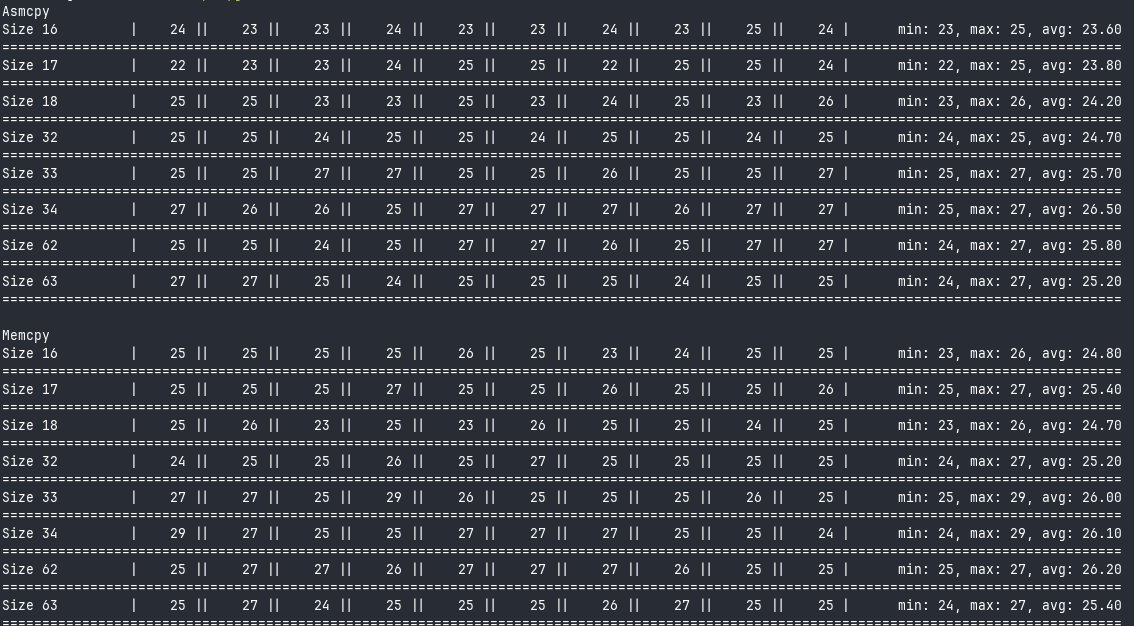
Now, let’s get to the results:
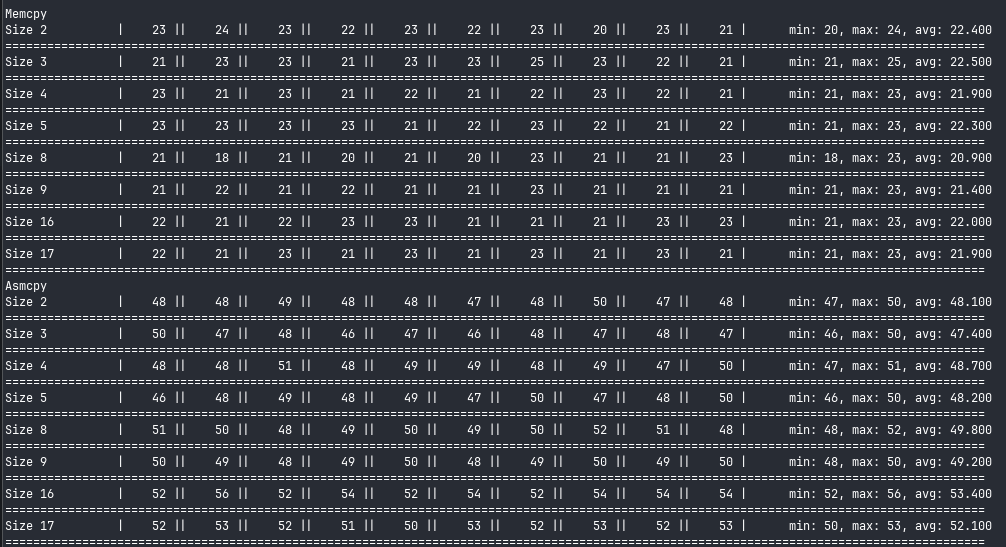
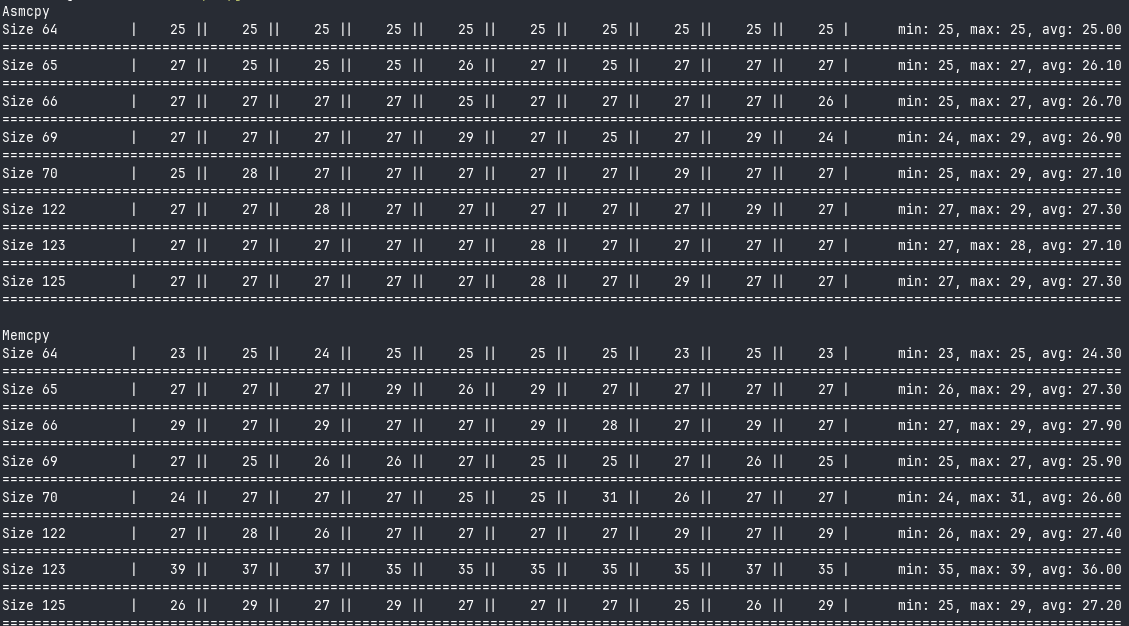
Glibc’s memcpy is twice as fast as our implementation for small strings. Let’s try for some bigger inputs:
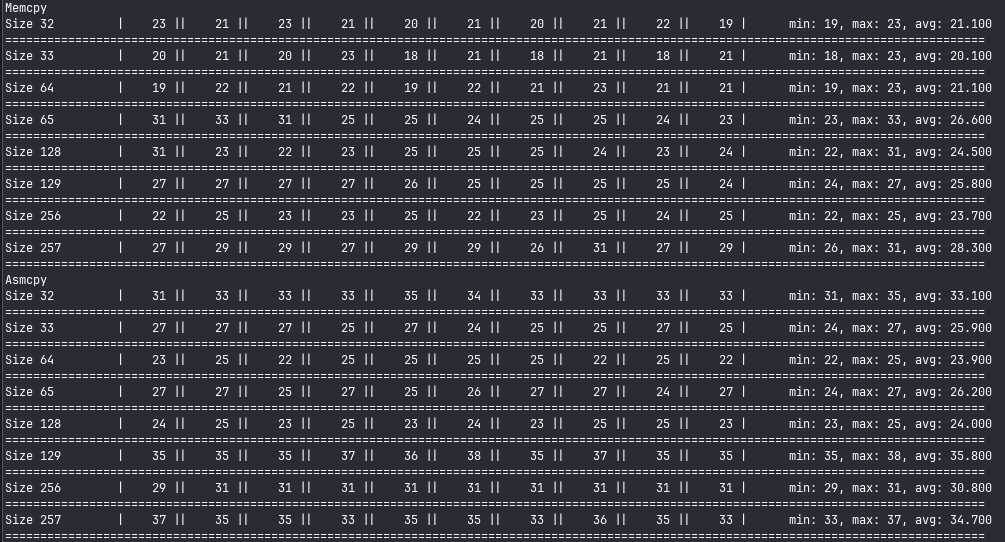
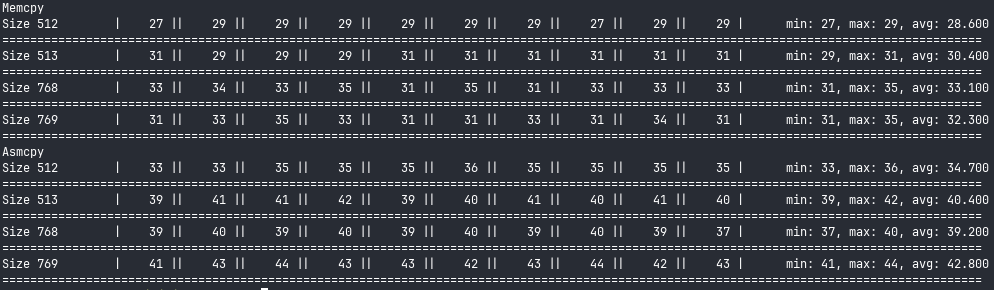
Interestingly, this seems to be the inverse of what i expected; due to rep movsb moving bytes at a time, I thought we’d be very competitive for small strings, and less so as the size increased. Instead, it seems like there is some sort of hidden optimisation in the CPU going on; the performance matches memcpy more and more for larger strings. (This is a good reminder to verify assumptions about code).
At this point, it’s time to take a closer look at how rep and movs work.
Rep and Movs — Under the Hood
Looking through the Volume 19 of the Software Developer Manual, there’s a section on “Fast-String Operation”.
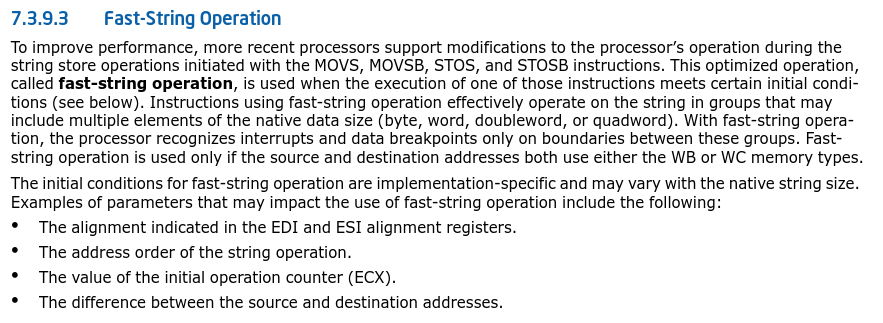

Interestingly, this might be a very good explainer for why the performance of rep movsb was so competitive for large strings — even though rep movsb specifies byte-by-byte moves, the processor is allowed to alter its execution internally to move groups of these elements at a time. This is another example of CPUs employing clever optimisations for significant performance gains.
How much of a gain, you may ask? Well, let’s replace the rep movsb with a naive movsb loop and see the differences.
global asmcpy

section .text
asmcpy:
    dec rdx
    movsb
    jne asmcpy
    ret
The dec instruction decrements the content of a register by 1, and sets the zero flag in the CPU if the new value of the register is zero. (If you’re not familiar with jumps and flags in Assembly, here’s a good explainer for you).
Next, movsb performs the byte-level move from rsi to rdi.
Then, we jump to the start of the loop if the zero flag has not been set.
Here are the results from this:
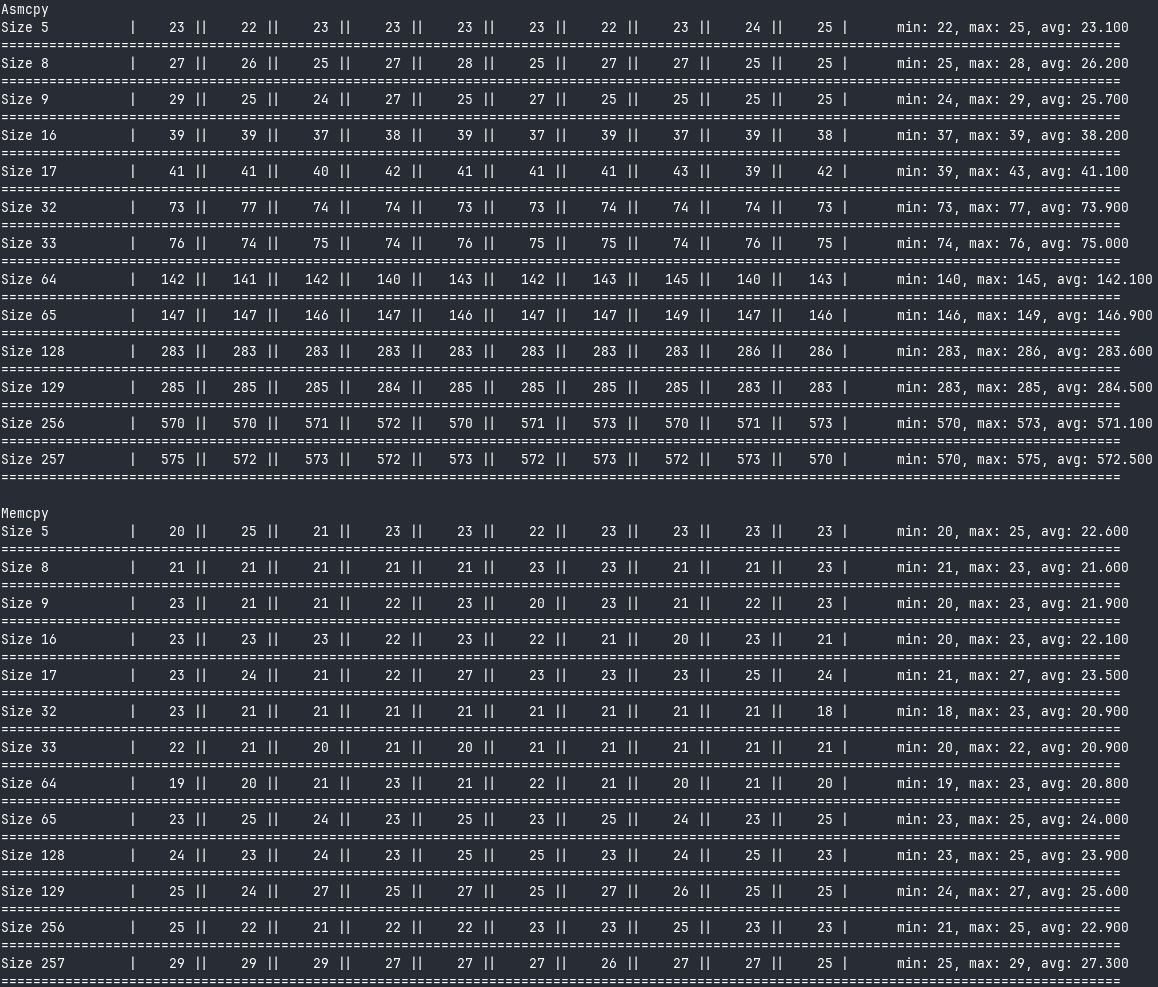
Now this is more like what I expected — we start out competitive with memcpy for small strings, and then get worse and worse as the input grows bigger. By the time we get to 256 bytes of input, asmcpy is more than 20x slower than memcpy. It’s clear, then, that rep movsb is doing some heavy optimisations in the processor to allow us keep up with memcpy.
Asmcopy, Revised
It’s clear that rep movsb is at least within the range of memcpy for large strings, so we’ll focus our optimisation efforts on making sure that we can keep up with memcpy for smaller strings, and progressively optimise on the way up.
Small Strings
Much of the improvement for small strings will center around a single concept — modern CPUs are heavily optimised to transfer blocks of data, rather single bytes at a time. This is even observable from the results; even though larger string sizes equate to more data being moved, there isn’t a linear scale up in the execution time of the different implementations.
With that in mind, here is our revised implementation:
global asmcpy
section .text
asmcpy:
    cmp rdx, 4
    jae .four
    mov rcx, rdx
    cld

.min:
    dec rdx
    movsb
    jne .min
    sub rdi, rcx
    mov rax, rdi
    ret


.four:
    cmp rdx, 8
    jae .eight
    mov ecx, [rsi + rdx*1 - 4]
    mov [rdi + rdx*1 - 4], ecx
    movsd
    sub rdi, 4
    mov rax, rdi
    ret

.eight:
    cmp rdx, 16
    jae .xmm
    mov rcx, [rsi + rdx*1 - 8]
    mov [rdi + rdx * 1 - 8], rcx
    movsq
    sub rdi, 8
    mov rax, rdi
    ret
Okay, we already know that the movsb loop is fine for small pieces of data, so we’ll leave that.
First, we have separate blocks for different input ranges. This is done to make sure that small strings only result in two copies at maximum. Control flow in Assembly is implemented by jumping between blocks based on different conditions.
Take the asmcpy, for example: first, we compare rdx(the count) with 4 and jump if the count is greater than or equal to 4. We accomplish this using the cmp and jae instructions. CMP takes two operands and performs performs integer subtraction between them (i.e a – b), but it also sets the eflags register based on the result. If you are unfamiliar with how control flow works at the CPU level, I’d recommend this brief write-up.
There’s an interesting trick here: Whenever we have data that straddles two native word sizes, i.e sizes between 4 and 8, or 8 and 16, we do two native copies and align them.
While we do “over-copy” a single element, it’s worth it for the efficiency of doing word-multiple copies.
mov ecx, [rsi + rdx*1 - 4]
Is just the CPU’s built-in way of doing array math. The syntax follows a simple pattern:
base + (index * scale) + displacement
Where
- base – usually points to the start of a memory region (think of it as
arr). - index – which element you want (like
iinarr[i]). - scale – the size of each element.
- displacement – a fixed offset added on top (can be positive or negative).
So in our example:
rsiis the base (pointer to the start of the array).rdxis the index.scale =1, because each element is 1 byte (char).displacement = - 4, which effectively steps back one dword.
Put together:
mov ecx, [rsi + rdx*1 - 4]
is equivalent to:
ecx = arr[i - 4];
We only use this for the elements from the native word size up to, but not including, the next word size (e.g 4, 5, 6, 7, but not 8), so we’re fine.
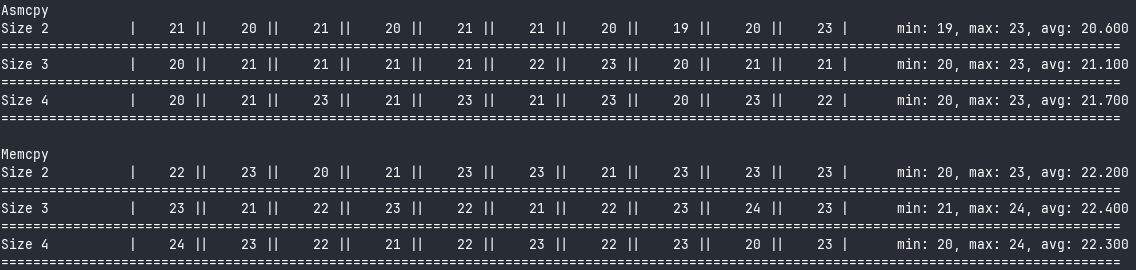
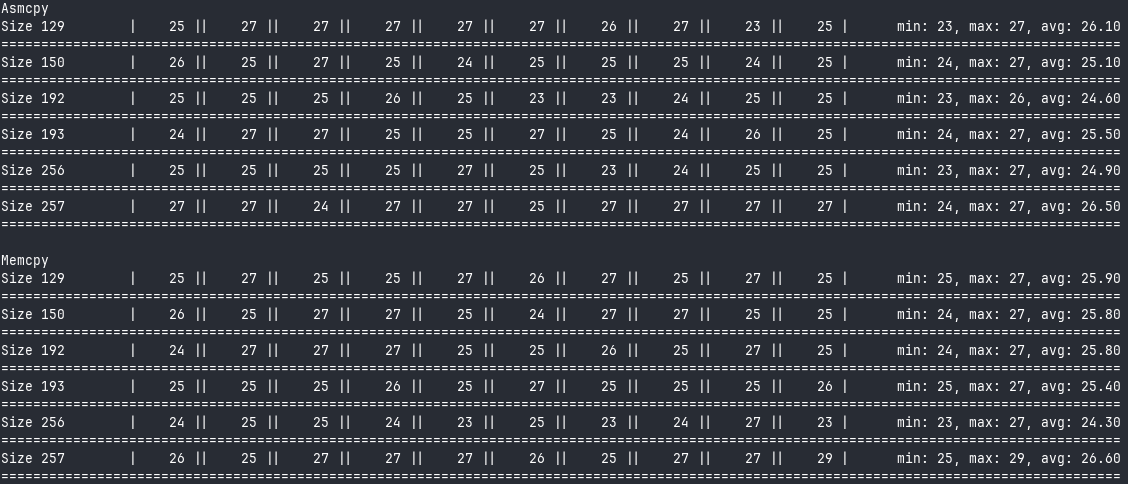
Let’s see how we stack up against memcpy again:
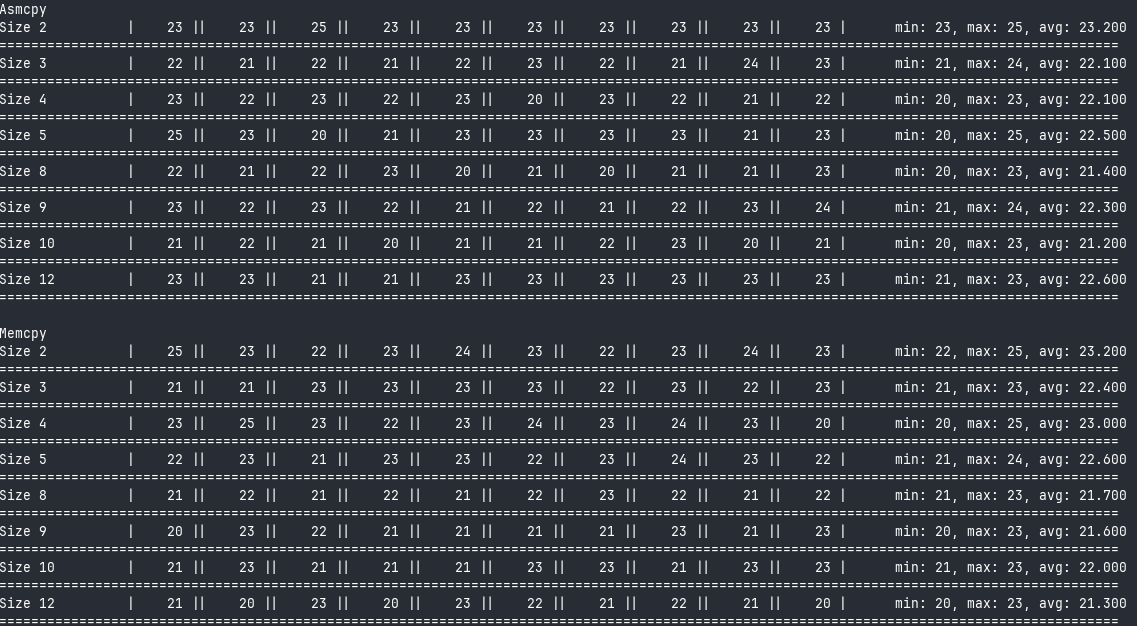
Neat! We’re actually on par with memcpy for small strings. Let’s go on to the next chunk.
SIMD!!!
I’m sure most people expected that we’d cover SIMD at some point in this. If you don’t know what SIMD is, I’ll give you a brief explainer.
SIMD, which stands for Single Instruction Multiple Data, is a mechanism on modern CPUs which allows them dispatch operations to multiple pieces of data in one instruction. SIMD works by packing data in registers, and operating in parallel on these “lanes”. SIMD allows an operation like this:
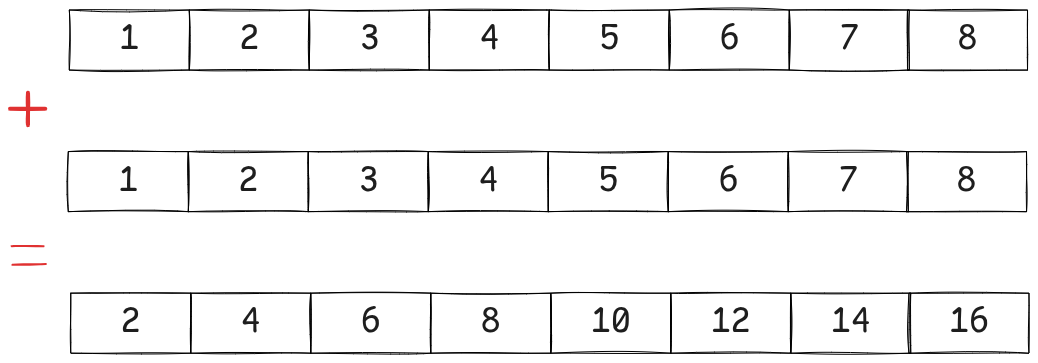
paddw xmm0, xmm1
where xmm0 and xmm1 are two of the special-purpose SIMD registers available to CPUs.
This allows us to compute the equivalent of 8 adds in one cycle. A very useful thing to have for parallelism. If you’re interested in a deeper exploration of SIMD, I’d recommend this article.
While SIMD does allow for parallel operations, we’ll mostly be using it here to allow us perform 16, 32, and even 64-byte moves in one cycle with the corresponding xmm, ymm, and zmm registers.
.xmm:
    cmp rdx, 32
    jae .ymm
    movups xmm0, [rsi + rdx - 16]
    movups xmm1,[rsi]
    movups [rdi + rdx - 16], xmm0
    movups [rdi], xmm1
    mov rax, rdi
    ret

.ymm:
    cmp rdx, 64
    jae .zmm
    vmovups ymm0, [rsi + rdx - 32]
    vmovups ymm1, [rsi]
    vmovups [rdi + rdx  - 32], ymm0
    vmovups [rdi], ymm1
    mov rax, rdi
    ret

.zmm:
    cmp rdx, 128
    jae .prepare
    vmovups ymm0, [rsi]
    vmovups ymm1, [rsi+32]
    vmovups [rdi], ymm0
    vmovups [rdi+32], ymm1

    vmovups ymm2, [rsi+rdx-64]
    vmovups ymm3, [rsi+rdx-32]
    vmovups [rdi+rdx-64], ymm2
    vmovups [rdi+rdx-32], ymm3

    mov rax, rdi
    ret
Shall we unpack this, then?
This is the same trick as before, only done with bigger sizes. movups and vmovups are SIMD instructions to move unaliged 16 and 32 bytes of data, respectively. You’ll soon realise that SIMD instructions can often be a mouthful, but one get used to it.
I really wanted to employ AVX512 since my 10th gen processor does have support for it, but I kept getting inexplicable performance dips for the AVX512 instructions and registers, so we’ll stick wih the 32-byte registers provided for us by AVX2.
Okay, let’s run some tests.
memcpy!
The Final Form
Okay, this is the point where we start employing some more tools. We’ve reached the limit of the registers available to us from the system, so it’s time to start using loops:
.prepare:
    xor rcx, rcx
    lea rax, [rdx-64]

.beyond:
    cmp rdx, 2048
    ja .rep
    vmovups ymm0, [rsi+rcx]
    vmovups [rdi+rcx], ymm0
    vmovups ymm1, [rsi+rcx+32]
    vmovups [rdi+rcx+32], ymm1
    add rcx, 64
    cmp rcx, rax
    jb .beyond

    vmovups ymm0, [rsi + rax + 32]
    vmovups ymm1,[rsi+rax]
    vmovups [rdi + rax + 32], ymm0
    vmovups [rdi + rax], ymm1
    ret

.rep:
    cld
    mov rcx, rdx
    rep movsb
    sub rdi, rdx
    mov rax, rdi
    ret
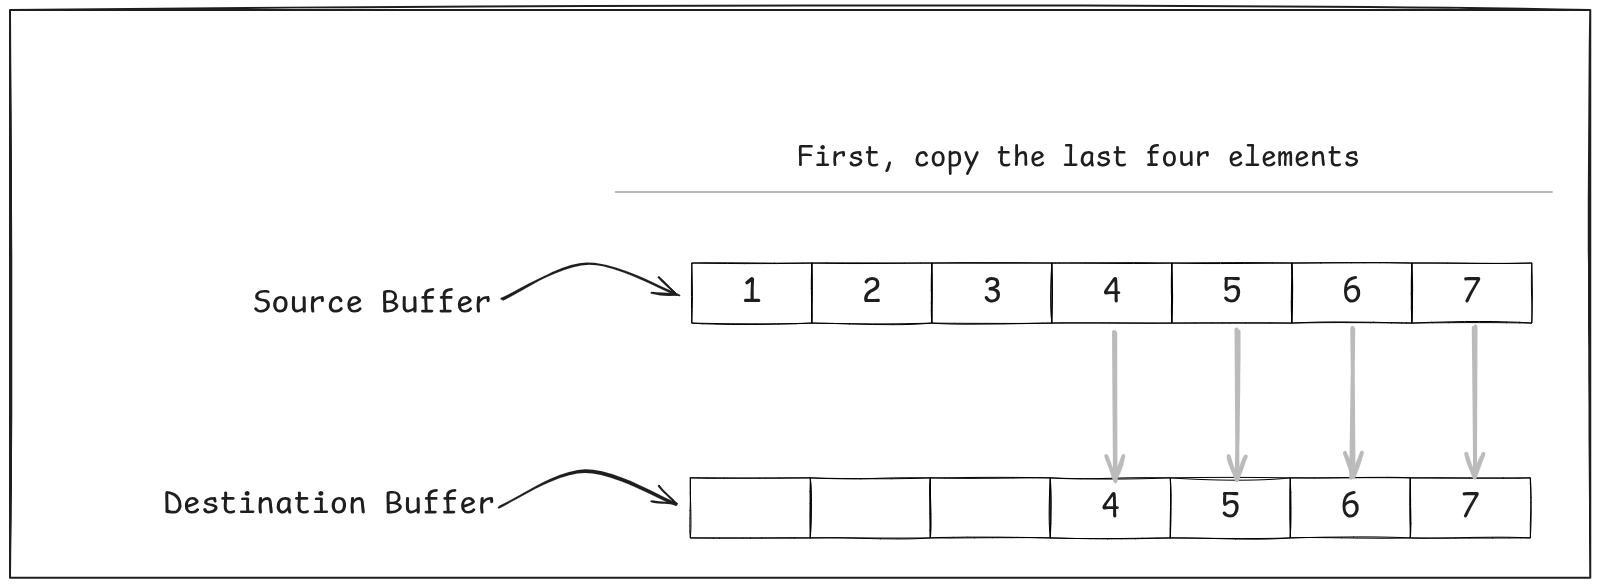
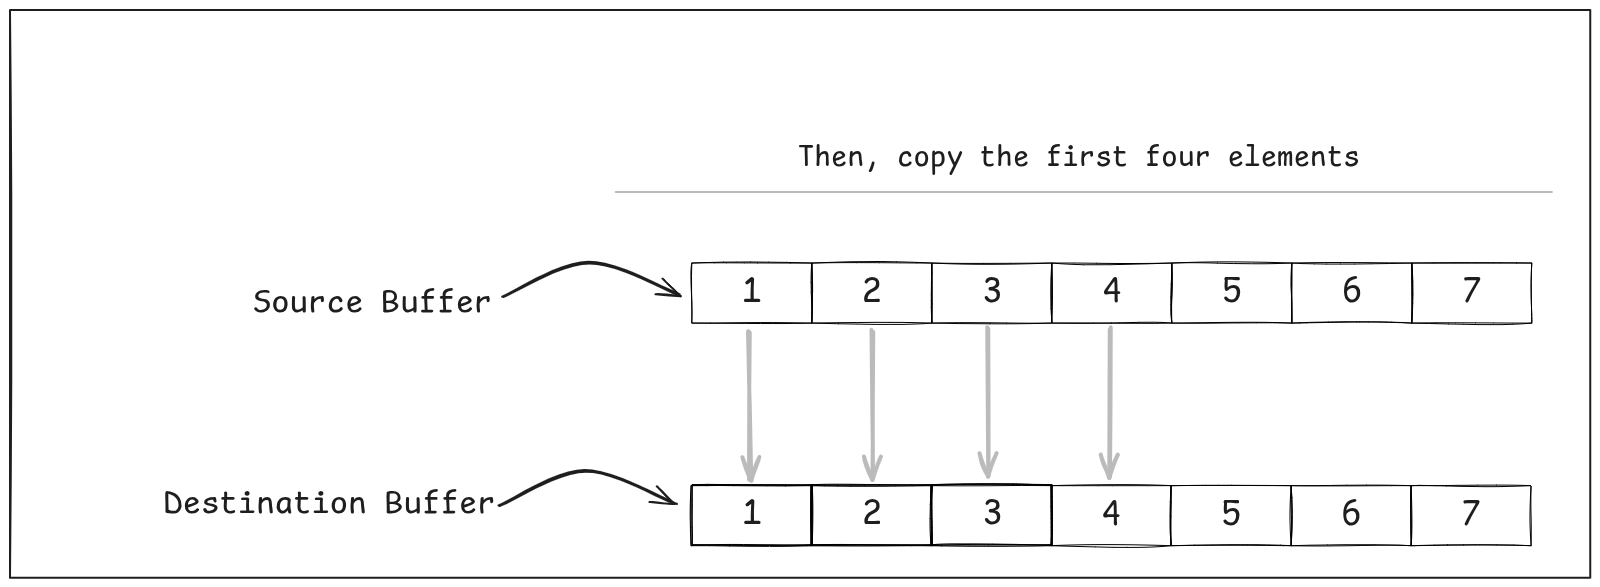
The trick here is this — copy as many 64-byte chunks of the source to the destination as possible until there are less than 64 bytes left, and then do an “over-copy” like we did before to copy the tail.
xor rcx, rcxis a little trick to clear a register (set it to zero).- We’ve not really looked at the
leainstruction, yet, but it’s useful for doing pointer arithmetic —lea rax, [rdx-64]roughly translates to “take the address inrdx, subtract 64 from it, and store that inrax”. There’s no law that stops us from usingleaon non-addresses, though, soleais often really useful to doing arithmetic in a single instruction. Here, we’re taking the count of elements inrdx, subtracting 64 from it, and storing that inrax. This allows us to know how many loop iterations we can run for the 64-byte loop. - You’ll notice that there are are two 32-byte moves. While this is done to allow moving 64 bytes in one iteration of the loop, there’s also a secondary reason: modern CPUs are able to execute multiple load and store operations simultaneously, but they need the instructions to be free of data dependencies. By unrolling the loop, we’ve given the processor more opportunities for instruction-level parallelism. Loop unrolling is a common technique used by compilers.
- And finally, the tail of the data. Again, we use the technique with “over-copying” the last 64 bytes from the source to the destination.
E.g Say we had to copy 142 bytes from src to dst….
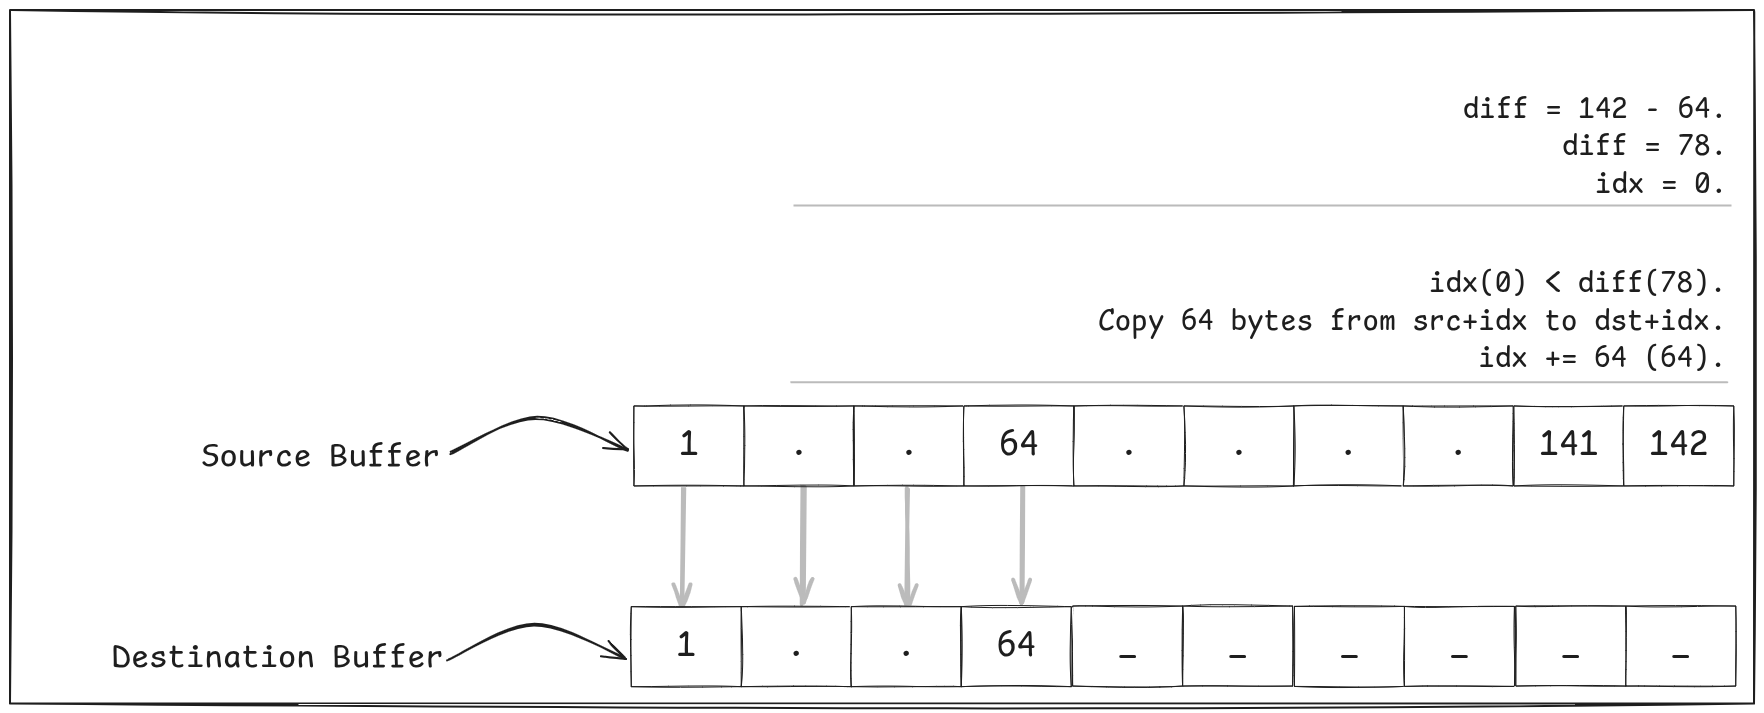
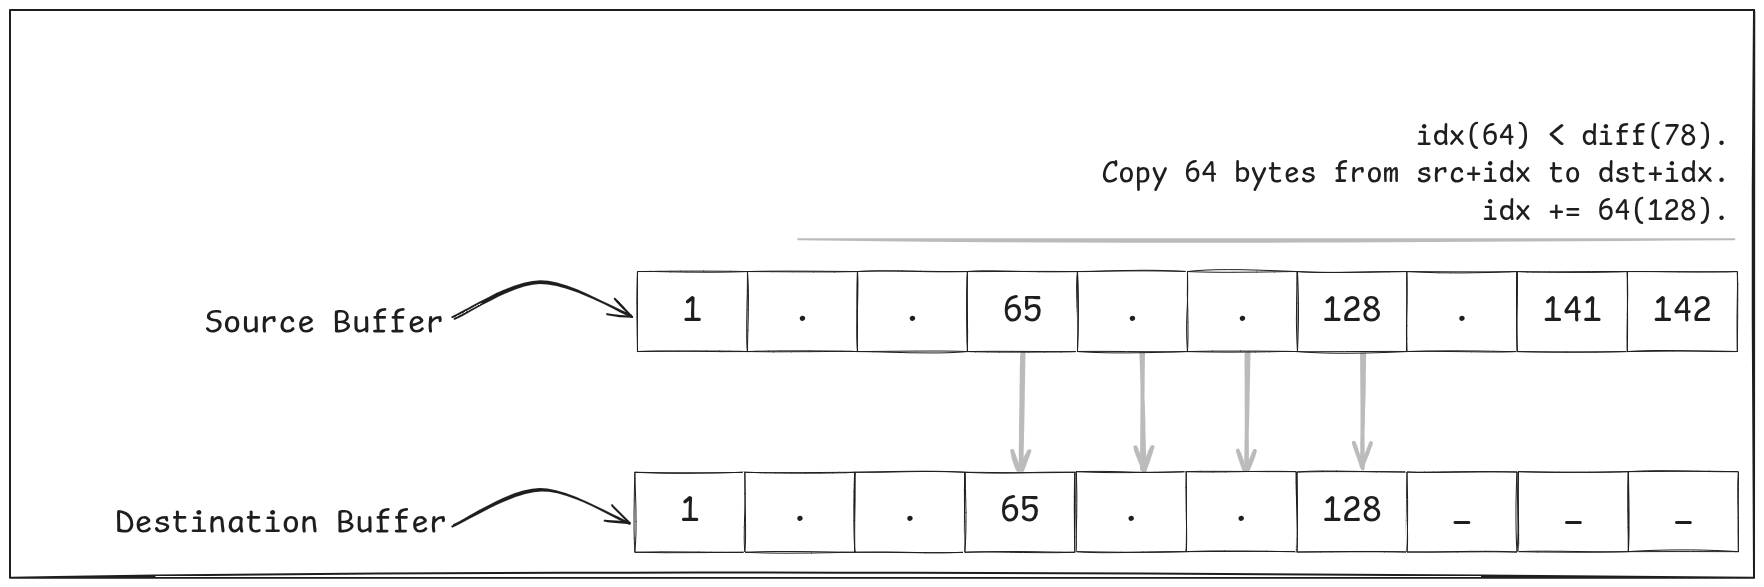
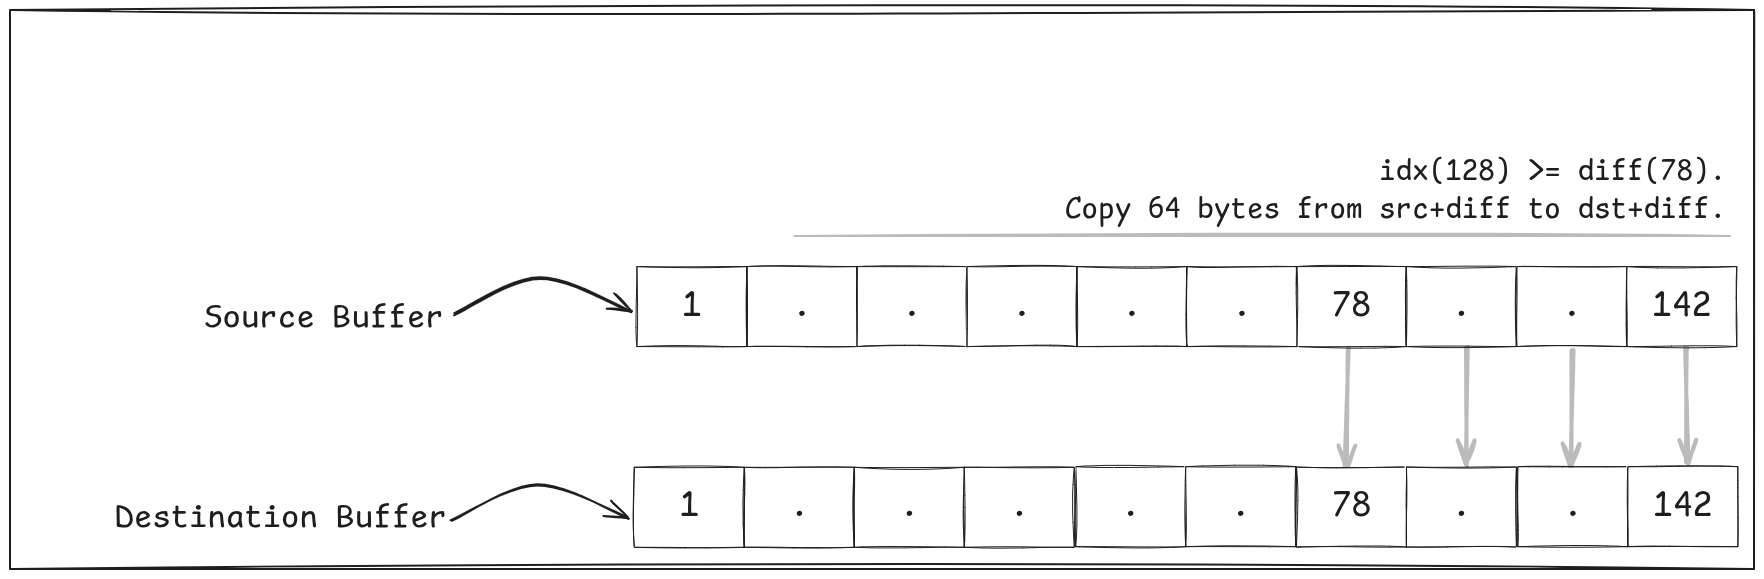
rep movsb — it has proven capable of keeping up with memcpy for this range of data.
At this point, you know what comes next. Let’s look at some results!
Looks like asmcpy is pretty much on par with memcpy. That brings a smile to my face.
In Conclusion…
This was honestly really fun. I set out on this journey with a relatively shallow understanding of SIMD, Assembly instructions, CPU-specific details, and how high-level primitives map to machine code. Now, I’m a lot more familiar with all of these, and can better appreciate all of the work that has to go into writing compilers and optimised code.
I hope this was pretty fun for you, too. Maybe it’s time for you to tackle something like this but for a different Libc routine. Perhaps it’s time to start the Rewrite It In Assembly movement.
Talk to me on Twitter.