AWS Machine Learning Blog: technical walkthrough. Commands and expected outputs are from a working deployment. Substitute your own account values throughout.
Replenishment automation starts with a demand forecast, and in retail that forecast has a short shelf life. By the time a planner exports it, checks it against supplier availability, and works down tens of thousands of stock keeping units (SKUs), the fastest movers have stocked out. For years the hard part was the forecast itself. Foundation models changed that, predicting demand across an entire catalog with no per-item tuning. The bottleneck moved downstream to the gap between a good forecast and an order placed on it.
That gap persists because the forecast and the action live in different systems. The forecast sits in a governed data platform. Supplier availability lives in a separate operational feed. And the person who places the order has a login for neither. This post builds the missing piece: a loop that detects a demand surge, decides which supplier can cover it, and places the order unattended. It escalates to a human only when no rule fits. It runs on Databricks and Amazon Quick, and the companion repository, together with the accelerator’s fresh_retail_net example that produces the forecast, has everything you need to reproduce it.
The solution runs in four stages: Databricks handles the Forecast, while Amazon Quick repeats the last three in the loop on a schedule.
- Forecast: Databricks Many Model Forecasting (MMF) serves Chronos-2 to predict 7-day demand for every SKU.
- Detect: a Databricks Genie Agent surfaces the SKUs in a surge, defined as a next-7-day average at least 1.5 times the prior-14-day average, and only for SKUs whose prior-14-day average is at least 1 (the floor that keeps low-volume noise out).
- Decide: Amazon Quick reconciles each surging SKU against live supplier availability in Amazon S3 Tables, a capability of Amazon Simple Storage Service (Amazon S3), and picks the cheapest supplier that can cover it.
- Act: Amazon Quick Flows places a routine purchase order through a Supplier Order API or raises a human-review ticket when no single supplier can cover the surge.
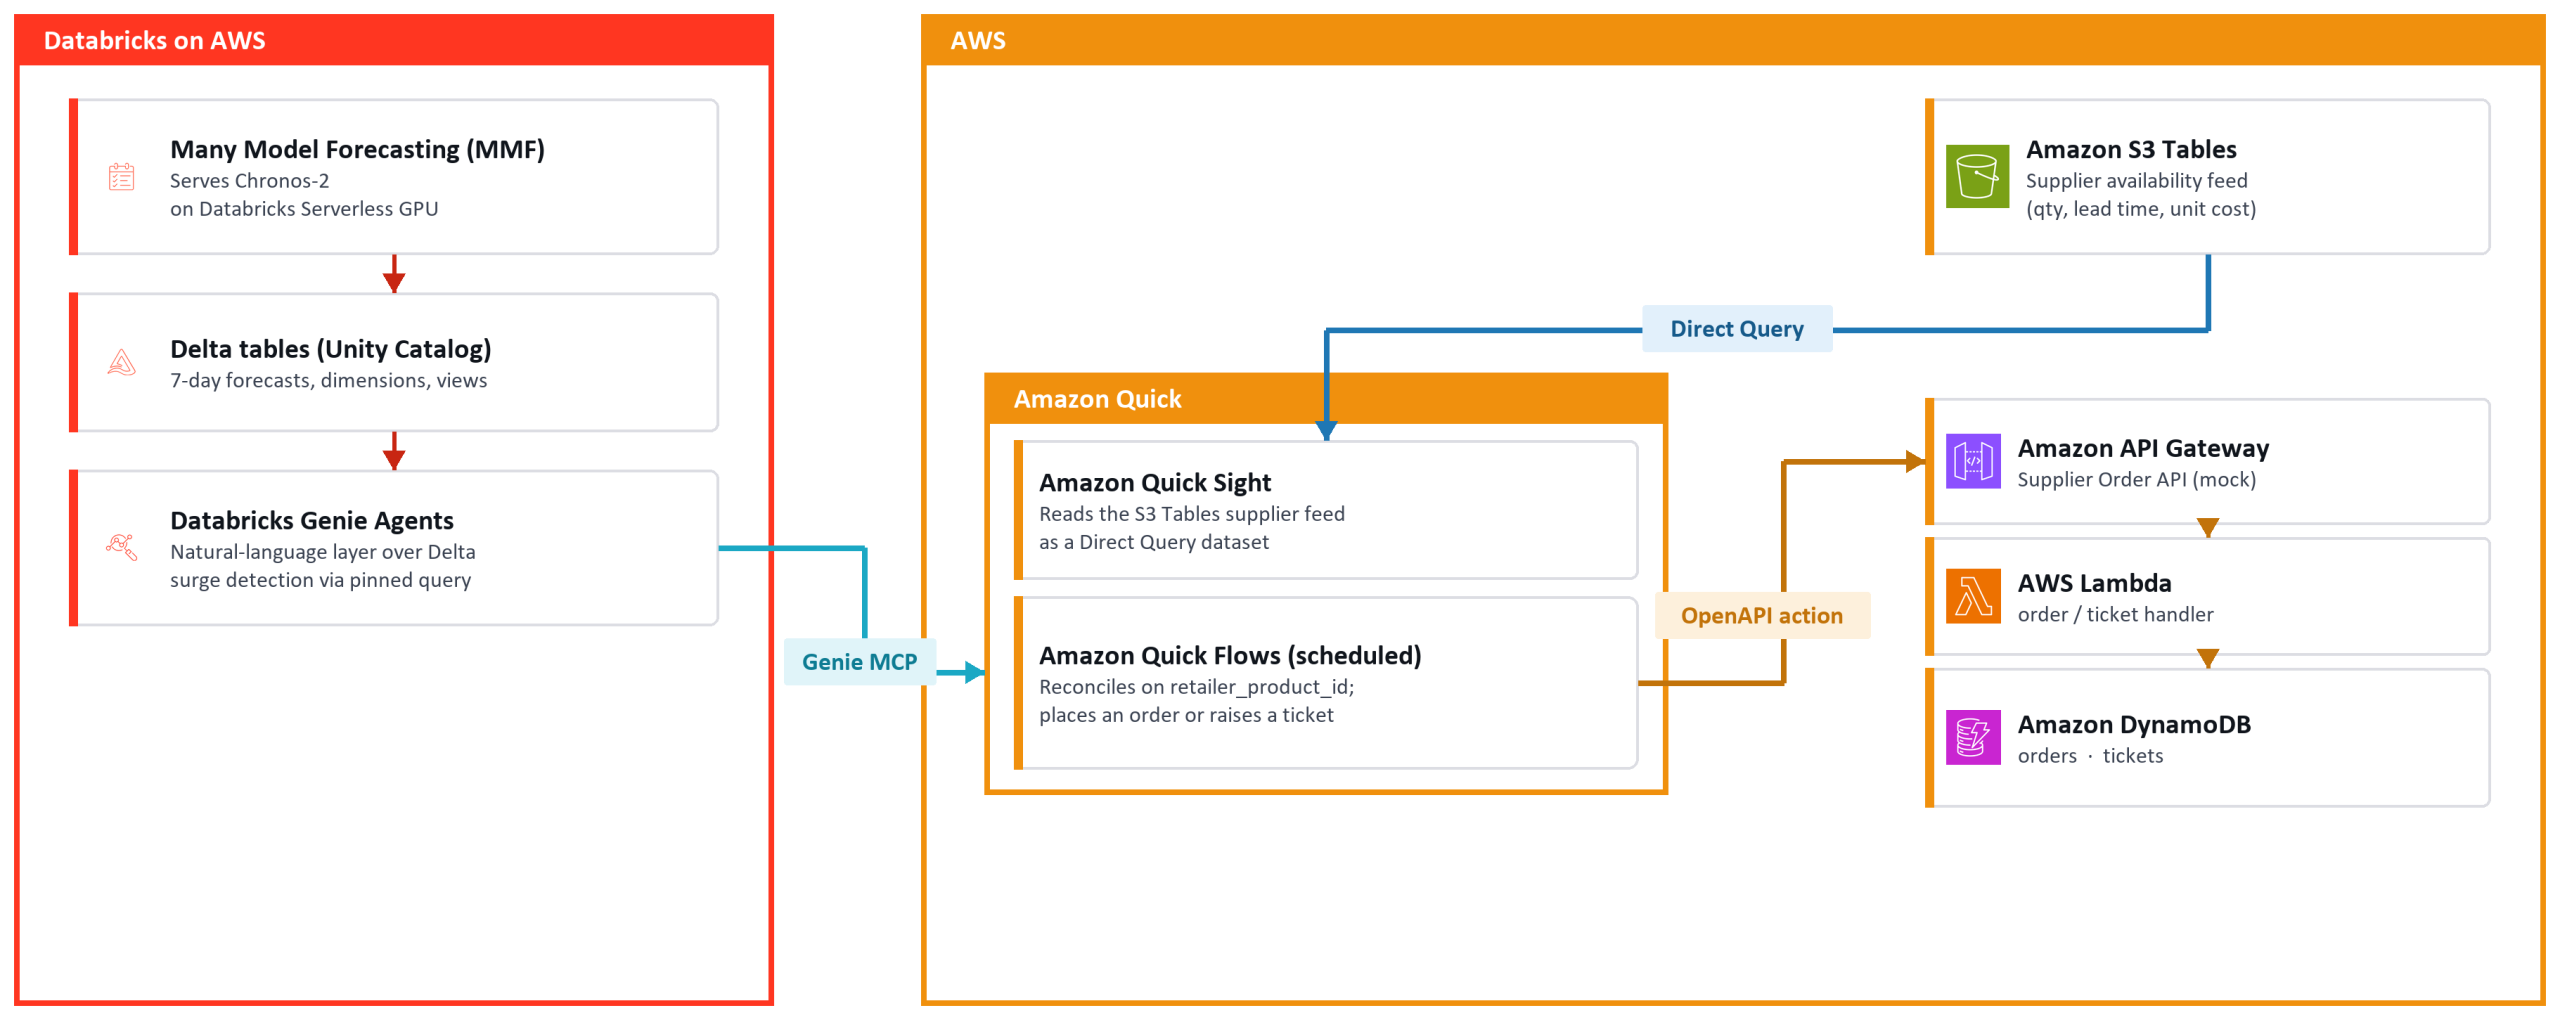
The following diagram shows how the four stages connect across Databricks and Amazon Quick.
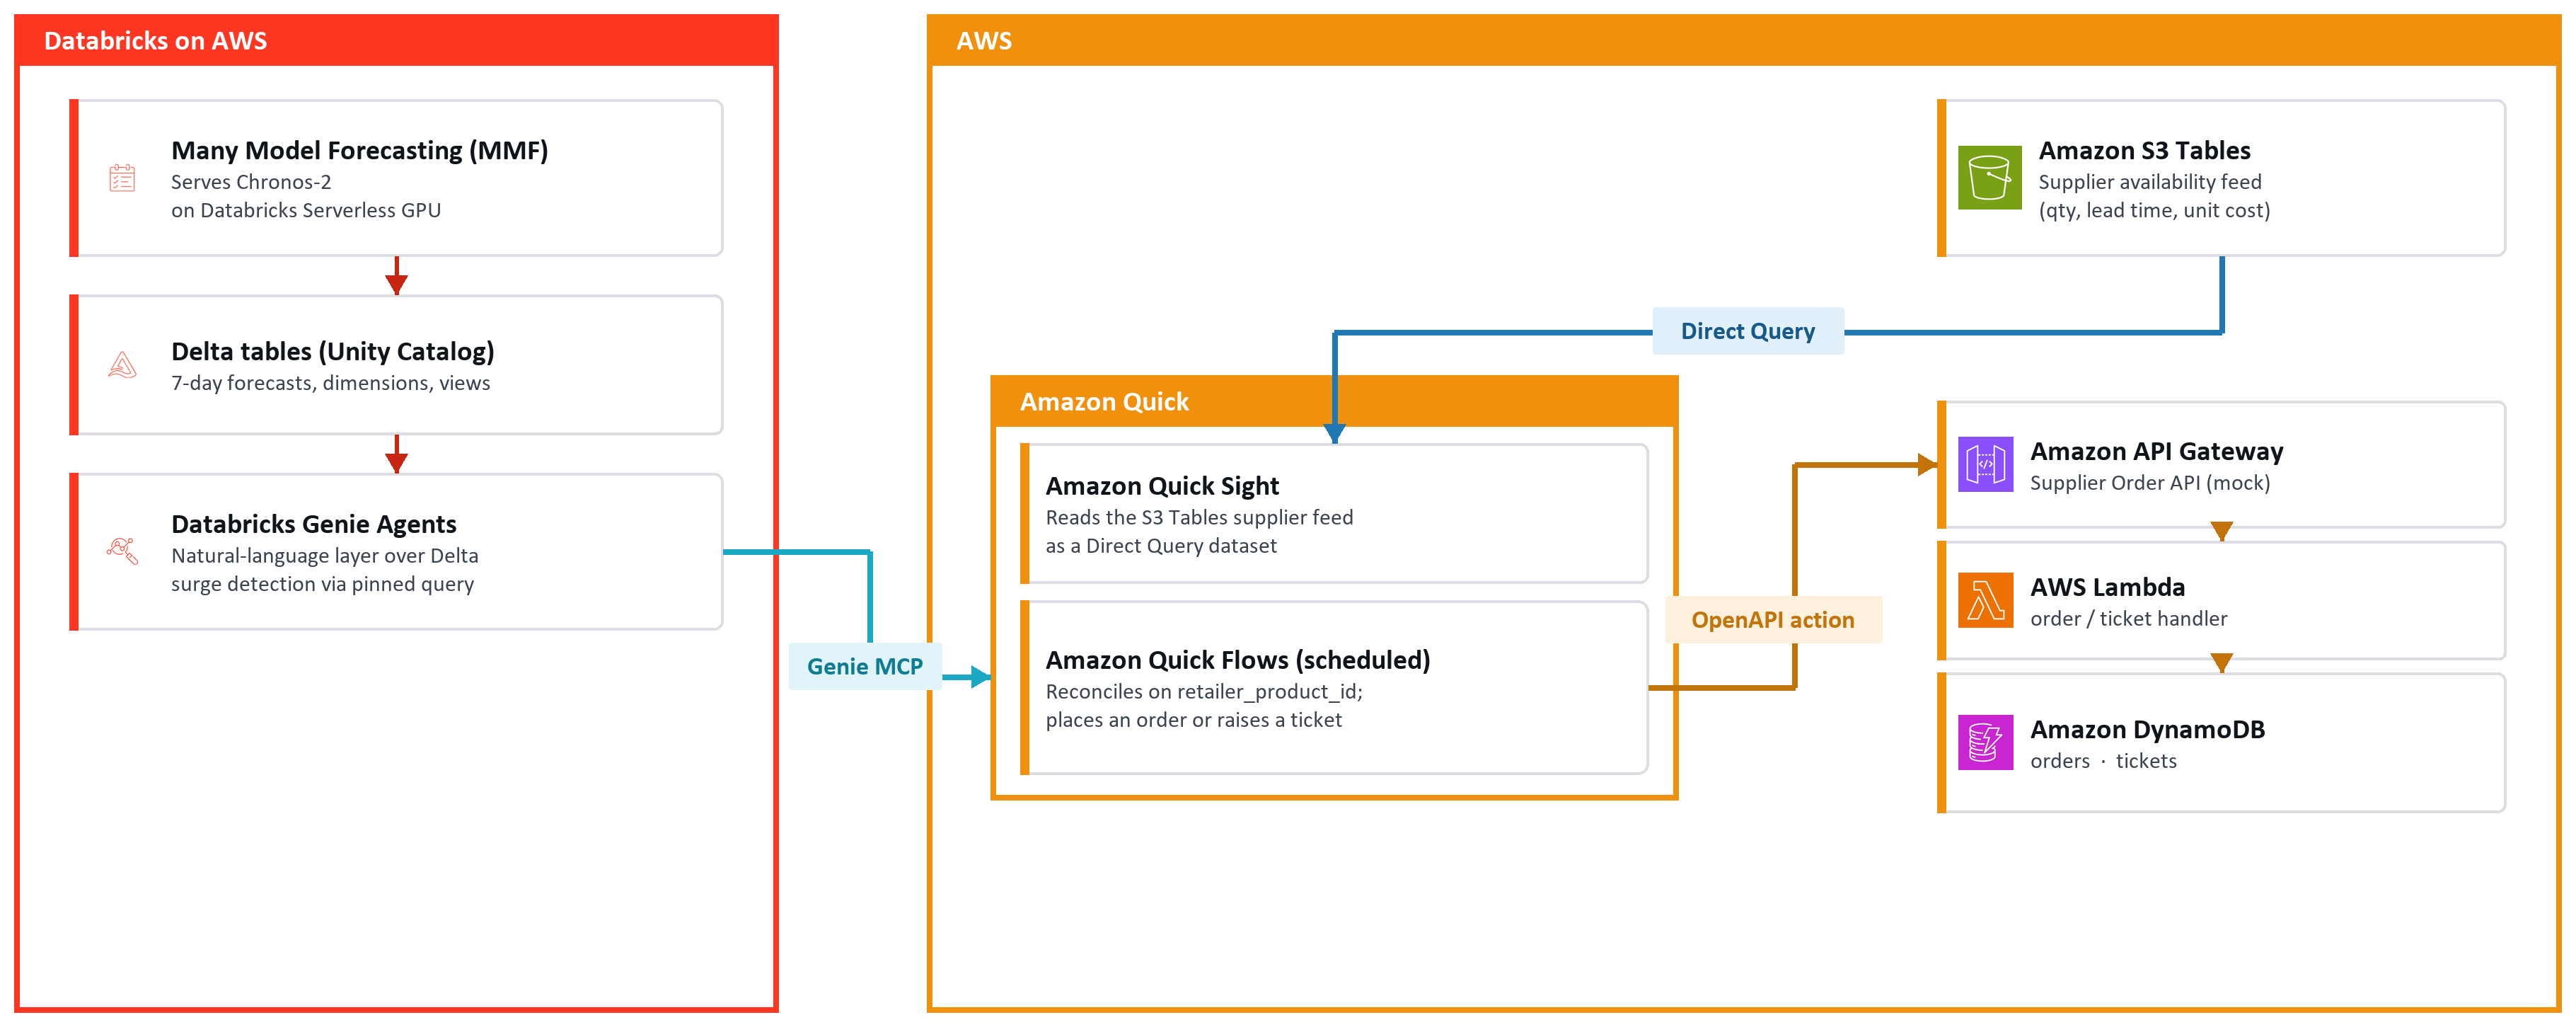
Figure 1. The detect, decide, act loop. A Databricks Genie Agent surfaces demand surges from the Chronos-2 forecast. In Amazon Quick, a Genie MCP connector retrieves the forecast, while Amazon Quick Sight reads the Amazon S3 Tables supplier feed as a live Direct Query dataset. Amazon Quick Flows reconciles demand against supply on a shared retailer_product_id, then places routine orders or raises exception tickets through the Supplier Order API.
How the pieces fit
Amazon Quick sits in the middle, the only component that touches both worlds. It reaches the forecast through a Databricks Genie Agent over the Model Context Protocol (MCP), pulls the supplier feed from S3 Tables, and calls the Order API through an OpenAPI connector, joining them on a shared product key at decision time rather than copying everything into one warehouse. Databricks produces the intelligence. Amazon Quick acts on it.
Prerequisites and setup
Everything runs from your local terminal with these tools: the Databricks CLI 0.299.0+, the AWS CLI 2.36.2+, jq 1.7, and uv (or Python 3.11) for the supplier-feed loader. The solution uses the create-flow, create-data-source, and create-space subcommands under aws quicksight. Clone the accompanying repository and run all commands from its root. Key files are genie/genie_space.json (the Genie Agent definition), flow/flow_definition.json (the flow), and cleanup/cleanup.sh (teardown).
Two account-level prerequisites gate the console steps, so confirm them before you start: your Amazon Quick user needs an Author or Author Pro role (Quick Flows and the MCP and OpenAPI connectors require it, and a plain non-Author Enterprise seat cannot create them), and your Databricks identity needs CREATE CATALOG on the metastore (or an admin to pre-create the mmf catalog).
Next, authenticate a Databricks workspace profile with databricks auth login. Then run databricks auth describe: the User line it reports is your <WORKSPACE_USER>, which notebook paths use.
All commands and scripts read account-specific values from a .supply-chain-automation-env file you create once and source. It contains your AWS profile, account, Region, the bucket name, the Quick account names, and the Databricks profiles, host, and account ID. The repository README has the template and the tool-install commands.
Two scripts cover every CLI-automatable step: scripts/setup_databricks.sh (notebooks, Genie Agent, OAuth app) and scripts/setup_aws.sh (Order API, S3 feed, Quick account, data source, space, flow). Both pause at the four console-only steps: the two action connectors, the S3 Tables access grant, and the dataset. To start, confirm your environment is loaded:
No field should be empty. Two constraints drive the design:
Region. Deploy in a Region that supports the agentic capabilities of Amazon Quick (action connectors, spaces, flows): See the documentation for the current list.
Two profiles, one you. Amazon Quick ties each resource to the identity that created it, so using the same identity for the CLI and the console is simpler. If they differ, the setup scripts handle it: during the datasource, space, and flow phases, each detects your CLI user, prompts once for your console username, and grants both owner access. Press Enter if they’re the same. The prompt appears only once.
Build the forecasting brain on Databricks
The intelligence side is entirely Databricks, in three moves: run the forecasting notebooks, expose the results through a Genie Agent, and register an OAuth app so Amazon Quick can reach that agent. The setup_databricks.sh script drives all three, one command per phase.
Run the notebooks. Notebooks 01 and 02 come from the MMF accelerator’s fresh_retail_net example, which serves Chronos-2’s zero-shot forecast across the catalog. Run them there first (02 is the compute-heavy one, on serverless GPU with an A10 the notebook configures itself) to produce the forecast tables. This repo ships the two AWS-authored notebooks that build on those tables: 04 (Genie views) and 03 (dimensions). This phase imports and runs them, 04 then 03, because notebook 03’s validation cell joins a view that notebook 04 creates. Both run on standard serverless.
When it finishes, the mmf catalog holds the six objects the Genie Agent will query: daily_sales_raw and demand_train (notebook 01), the scoring_output_mv and evaluation_metrics_mv views (notebook 04), and product_dim and location_dim (notebook 03). Confirm them with databricks tables list mmf fresh_retail_net. You can also open the notebooks in the workspace and Run All in the same order if you prefer to watch each one.
Create the Genie Agent. This turns a table of forecasts into something a business user can question in plain English. The agent’s full definition is in genie/genie_space.json: the six tables, the surge-detection instructions, and a pinned example query that keeps the surge answer deterministic (more in the design section). The phase creates a small serverless PRO SQL warehouse and binds the agent to it.
It prints and saves GENIE_SPACE_ID to scripts/.env.generated. Keep that value handy. You will paste it into the Amazon Quick connector shortly.
Register the OAuth app. Quick reaches the Genie Agent over the Model Context Protocol (MCP) using user-delegated (three-legged) OAuth. Genie queries run as the person who authorized the connection. Make sure that user has read access to mmf.fresh_retail_net. This phase registers a confidential OAuth app in Databricks and returns a client ID and secret for the connector.
This is an account-level action (accounts.cloud.databricks.com), a higher privilege than the workspace access the earlier phases used. If you are not a Databricks account admin, have one run it and hand you the client ID and secret. And copy the client secret the moment it prints, because Databricks shows it only once. Keep it somewhere safe until the connector step. The underlying create command and a console alternative are in the README.
Stand up the supplier feed and the Order API
The action side needs two things the forecast cannot provide: a live view of what suppliers can ship, and a system to send the order to. Both live outside Databricks, as they would in a real enterprise.
The supplier feed is an independent operational feed in Amazon S3 Tables (Apache Iceberg), separate from the forecasts. The feed phase creates the bucket and runs a loader that derives a synthetic supplier catalog from the public FreshRetailNet-50K product keys. The loader generates three suppliers per product and city over a 7-day window. Its output is deterministic: every run produces the same 63,861-row feed. One supplier set is under-stocked on purpose, so a later surge that no single supplier can cover is what exercises the human-review path.
The Supplier Order API stands in for the supplier’s own ordering system: Amazon API Gateway in front of AWS Lambda and Amazon DynamoDB, with the API key stored in AWS Secrets Manager. The flow calls it to place orders (POST /orders) or raise tickets (POST /tickets). The two DynamoDB tables are where you read results. The order-api phase deploys the AWS CloudFormation stack and saves its ApiBaseUrl to scripts/.env.generated.
Wire up Amazon Quick
With the brain and operational systems in place, the rest of the build lives in Amazon Quick: the account, the two connectors (to the Genie Agent and the Order API), and the data source, dataset, and space that expose the supplier feed.
First, provision an Amazon Quick account. The quick-account phase creates a subscription with IAM_AND_QUICKSIGHT auth in your Region. If one already exists, the script adopts it rather than erroring, so it is safe to run either way.
It waits for ACCOUNT_CREATED and prints the Quick user your CLI credentials map to. That user owns every resource you create using CLI. Open the console URL the script prints. The first time, Amazon Quick shows a welcome screen. Enter your email and continue. You land on the home page, ready for the console steps.
Cost. Amazon Quick Enterprise edition (monthly per-user billing) is the main recurring cost. All other resources are usage-based and small for demo volumes. Tear down with the Clean up section when finished.
Connect the Genie Agent (MCP connector)
Amazon Quick reaches the Databricks Genie Agent through an MCP action connector: Quick’s MCP client connects to the Genie MCP endpoint and registers the agent’s tools as actions the flow can call. Action connectors are created in the Amazon Quick console, the first of two console steps.
As a best practice, sign in to Databricks in the same browser before you start. The connector’s OAuth authorization attaches to an active Databricks session without additional prompting. Then follow the custom MCP action connector steps in the Amazon Quick action connectors documentation, choose User authentication (OAuth), and supply these values from the resources you created earlier:
| Field | Value |
| Name | Databricks Supply Chain Genie |
| Description | Supply chain demand forecast intelligence via Genie Agent |
| MCP server endpoint | https://<WORKSPACE_HOST>/api/2.0/mcp/genie/<GENIE_SPACE_ID> (GENIE_SPACE_ID is in scripts/.env.generated) |
| Client ID | in scripts/.env.generated (saved by the OAuth step) |
| Client Secret | the value you copied from the OAuth step’s output (not saved to disk) |
| Token URL | https://<WORKSPACE_HOST>/oidc/v1/token |
| Authorization URL | https://<WORKSPACE_HOST>/oidc/v1/authorize |
| Redirect URL | https://<REGION>.quicksight.aws.amazon.com/sn/oauthcallback (auto-populated. Matches the redirect the OAuth step registered, so no change needed) |
Complete the OAuth authorization, and Quick auto-discovers the Genie tools. Share the connector with whoever will run the flow. The flow definition needs the connector’s ID, so read it with the CLI:
That Id is <GENIE_MCP_CONNECTOR_ID>, which the flow references. This connector exposes its discovered tools under the single action ID ALL, so there are no individual action IDs to collect here.
Register the Order API (OpenAPI connector)
The flow submits purchase orders and raises tickets by calling the Supplier Order API. It reaches the API through an OpenAPI action connector. Follow the OpenAPI custom-connector console steps in the Amazon Quick action connectors documentation and supply these values:
| Field | Value |
| Schema | upload order-api/supplier-order-api-openapi-flows.json from the repository (.json, < 1 MB) |
| Name | Supplier Order and Ticket OpenAPI |
| Description | Submit routine purchase orders and raise human-review tickets on the Supplier Order API |
| Base URL | your Order API ApiBaseUrl, saved as API_BASE_URL in scripts/.env.generated (https://<API_ID>.execute-api.<REGION>.amazonaws.com/prod) |
| Authentication | None by default. The demo endpoint accepts unauthenticated writes. Deploy the stack with RequireApiKey=true (or front it with an authorizer) to require the x-api-key for anything beyond a supervised demo. |
The connector registers two write actions: SubmitOrder (POST /orders) and CreateTicket (POST /tickets). The flow references three IDs from this connector. Collect them now.
- The connector ID (
<OPENAPI_ACTION_CONNECTOR_ID>). Read it with the CLI:
- The two action IDs (
<OPENAPI_SUBMIT_ORDER_ACTION_ID>and<OPENAPI_CREATE_TICKET_ACTION_ID>). - On the console, open the connector and choose Test action on SubmitOrder and CreateTicket. Each panel shows its action ID.
Add the supplier feed (S3 Tables data source)
Amazon Quick Sight, the business intelligence capability of Amazon Quick, reads the supplier feed from S3 Tables through a data source (one console action plus one script phase). It queries in Direct Query mode, so each run sees the latest ingest rather than a cached SPICE copy.
First, grant Quick access to the bucket. This is a one-time console step. On the console:
- Choose Manage Account, then AWS Resources.
- On the “Quick access to AWS services” page, keep the default Use Quick-managed role.
- Under Allow access and autodiscovery for these resources, select Amazon S3 Tables, then Select S3 table buckets from current Quick account and Region.
- Choose your bucket, and Save.
Quick creates its managed role for you. See Creating a dataset using Amazon S3 Tables for the full procedure.
With that in place, the datasource phase creates the S3 Tables data source over your bucket:
Create the supplier dataset
The flow’s supplier lookup reads a Quick dataset built on the data source. Create it in the Quick console:
- Choose Datasets, then New dataset, then Supplier Availability S3 Tables.
- Confirm the auto-discovered Namespace
supply_chainand Tablesupplier_availability. - Name the dataset
supplier_availability. The read-back command below andcleanup.shboth look the dataset up by that name, so matching it keeps those one-liners working. - Choose Directly query your data (not SPICE: Direct Query keeps the feed live), then Visualize.
Visualize commits the dataset, then opens an analysis chooser you don’t need. Close it. The dataset already exists. The full procedure is in Creating a dataset using Amazon S3 Tables.
Read the dataset’s ID with the CLI:
Set that Id as DATASET_ID in your environment. The space step needs it.
Create the supplier space
The flow’s Lookup Suppliers step does not read the dataset directly. It reads a Quick space the dataset belongs to, a collection of Quick resources the flow references by Amazon Resource Name (<QUICK_SUPPLIER_SPACE_ID>). The space phase creates the space and adds the supplier_availability dataset to it as a DATA_SET resource. It reads DATASET_ID from your environment, then confirms the dataset is attached:
The script saves the resulting QUICK_SUPPLIER_SPACE_ID for the flow step.
Assemble the autonomous flow
This is where detect, decide, and act come together as one flow. It detects surges through the Genie Agent, then for each surging SKU it looks up suppliers, picks the best one, places an order or raises a ticket, and summarizes the outcome. The flow phase fills the placeholders in flow/flow_definition.json with your resource IDs and creates the published flow.
Flow structure (from flow/flow_definition.json)
- Detect Demand Surges (Quick data step using the Genie MCP connector): asks the Genie Agent for surging SKUs.
- SKU Processing (reasoning group, looping over the Detect Demand Surges output): for each surging SKU:
- Lookup Suppliers (Quick data step, using the S3 Tables supplier space).
- Select Best Supplier (reasoning): cheapest supplier whose 7-day capacity covers the 7-day forecast. If none covers, mark it an exception.
- Submit Order (connector action, using OpenAPI
submitOrder): runs only when the decision is routine. - Raise Ticket (connector action, using OpenAPI
createTicket): runs only when it’s an exception. - Generate SKU Summary (reasoning).
- Generate Consolidated Report (reasoning).
Create and run the flow
The flow phase fills the placeholders in flow/flow_definition.json with your resource IDs and creates the published flow:
The script reports the FlowId and saves it to scripts/.env.generated (cleanup uses it later). To run the flow unattended, create a schedule for it on the console. Enable Run with no confirmation, so routine write actions auto-submit. (Interactive runs present each order and ticket as a confirmation form, which is useful for testing.)
Validate
With the accompanying sample data, one run yields six surging SKUs, five routine orders, and one exception ticket (counts specific to this demo dataset, not a performance benchmark). The exception is product 122 (Northeast), the SKU the feed deliberately under-supplies: no single supplier covers its 7-day demand, so the flow raises a ticket instead of an order. The five routine orders are products 261, 191, 299_300, 450_300, and 4. Confirm in DynamoDB, listing the orders and the ticket:
A recurring schedule appends a fresh batch each interval, so disable the schedule after validating to stop it placing further orders.
Design choices that make it operationally sound
Wiring the components together is the straightforward part. A few choices separate a loop you can leave running from a demo that works once, and they generalize past supply chain.
Coordinate independent sources, not consolidate. The forecast, the supplier feed, and the Order API stay in their own systems, joined on a shared product key only at decision time: no extract, transform, and load (ETL) pipeline to break, no sync job to monitor, no stale-data bugs. Because the supplier feed also belongs to a system you do not control, the pattern travels, assuming no common ownership of the data.
Pin the surge query so the automation is repeatable. Genie regenerates SQL per question: right for a human exploring data, wrong for a scheduled job that needs the same answer every run. So the shipped Genie definition pins the surge query and states the numeric floor explicitly (prior-14-day average actual sales of at least 1), and six surging SKUs come back as six every time rather than drifting with the model’s phrasing. The scheduled job gets a repeatable query while people keep natural-language access.
Grade the autonomy to the decision. The loop automates the predictable majority and escalates the rest: when a single supplier covers the 7-day forecast the order submits itself. When none can, the SKU becomes a ticket. Same rule, per item, at a catalog scale no planner could match manually.
Do not tie the design to one model. The loop needs a probabilistic forecast that generalizes across a large catalog without per-item tuning. Chronos-2 delivers that today, but nothing downstream is wired to it, so the loop ages well as models improve. The durable asset is the closed loop from prediction to action. A better forecast makes it better, not obsolete.
Clean up
To avoid ongoing charges, tear everything down when you are done. The cleanup/cleanup.sh script discovers and removes the whole solution in dependency-safe order:
- The Quick flow, space, dataset, data source, and connectors.
- The Databricks Genie Agent, SQL warehouse, and
mmfcatalog. - The Order API stack, which removes its Lambda, DynamoDB tables, and secret.
- The S3 Tables bucket.
It leaves account-wide resources such as the Quick subscription and the Databricks OAuth app in place. Removing those requires your confirmation, since they may be shared with other work.
Disabling the flow schedule first stops it from placing new orders while you tear down.
Conclusion
You now have a replenishment loop that runs without a human in the seat: Chronos-2 forecasts feed a Genie Agent that flags surges, and Amazon Quick reconciles each against the supplier availability feed. Amazon Quick Flows then places the order or escalates the exception, and you can put the whole loop on a schedule. The pattern generalizes beyond retail: whenever a forecast in one system must be reconciled against operational data in another and acted on, this detect-decide-act structure applies. Clone the accompanying repository to reproduce it, then adapt the Genie instructions, supplier logic, and Order API to your domain.